How to Edit Translated Videos Online: Complete 2026 Guide
April 24, 2026 18 mins read
Your first AI-generated translation is rarely perfect — and it doesn't need to be. Modern AI dubbing platforms let you edit subtitle text, timing, voice style, and speaker assignment, with changes reflected in the dubbed audio in seconds.
VideoDubber.ai provides unlimited free edits on all translated videos. This guide covers every editing capability — from click-to-edit subtitles to advanced timestamp controls and multi-speaker voice configuration.
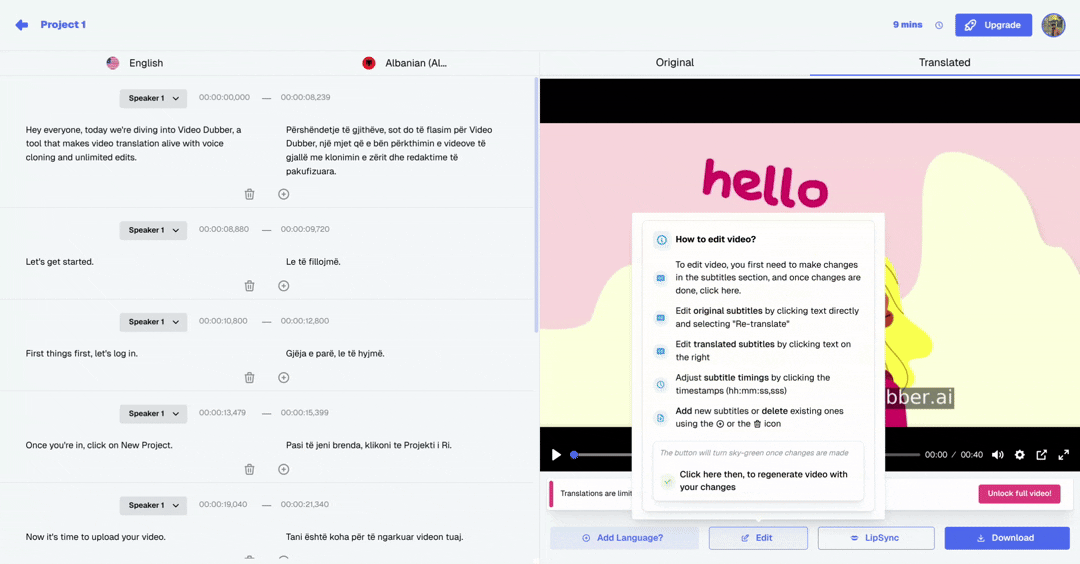
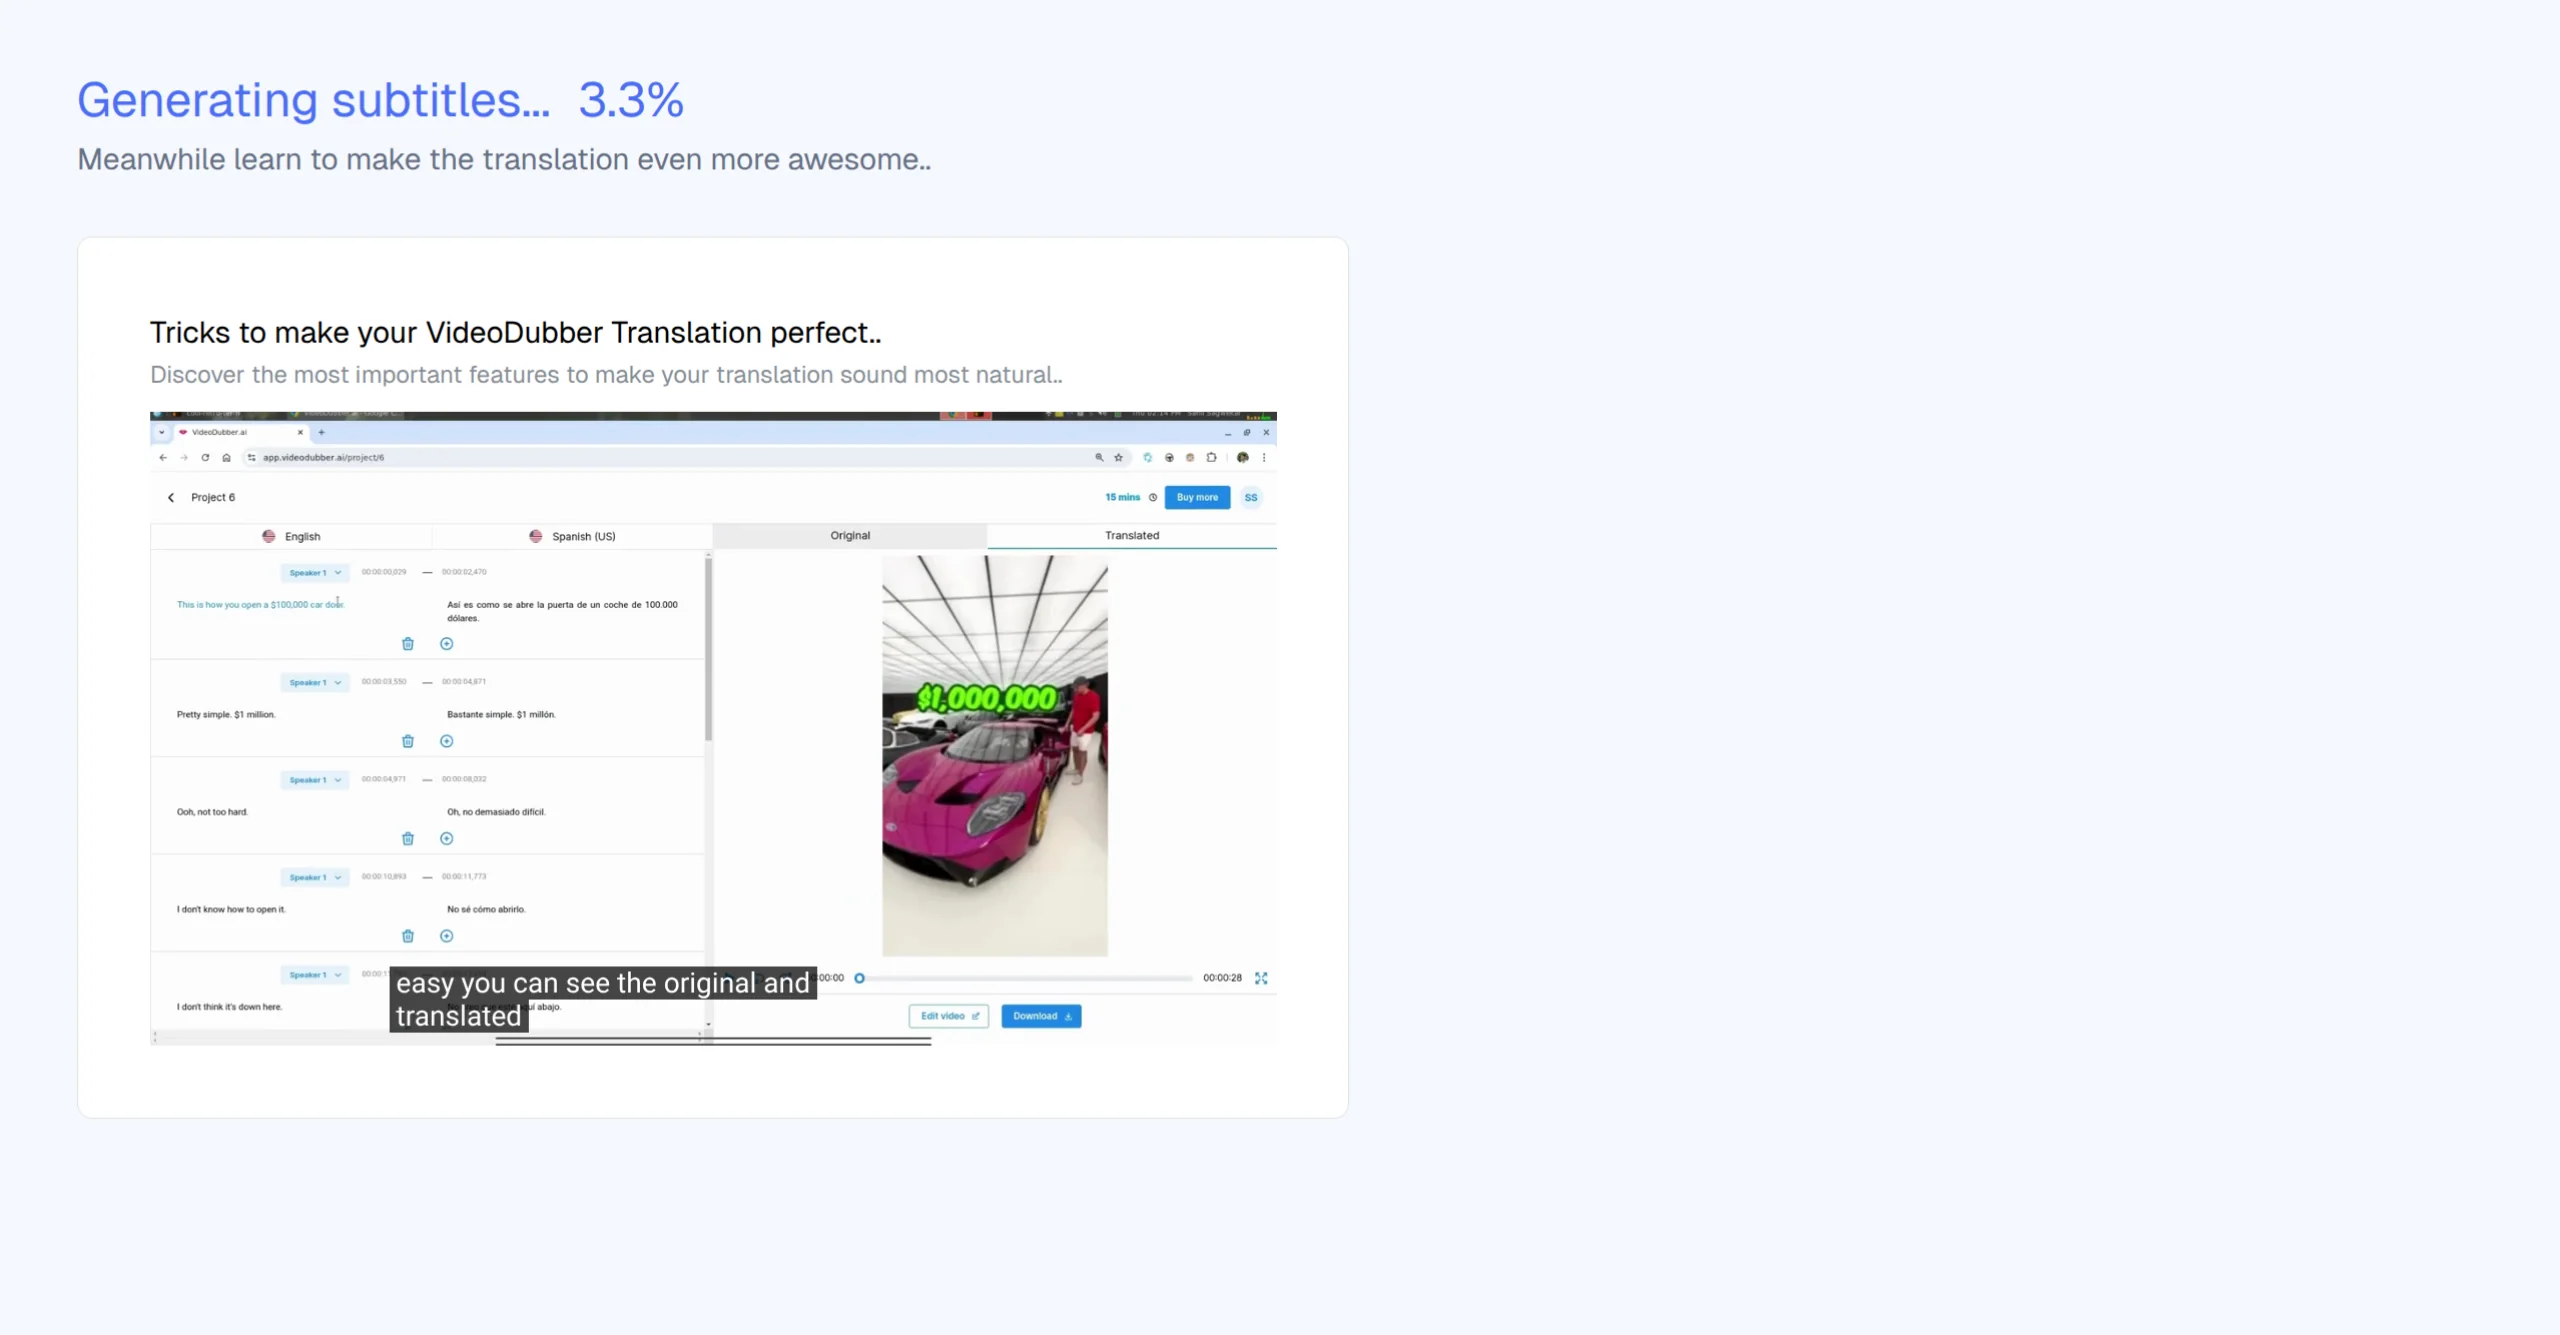
The VideoDubber.ai editor — choose voiceover styles, edit subtitles, and perfect your translations with an intuitive interface.
How to edit translated videos online: Log in to VideoDubber.ai, open the project from your dashboard, and use the built-in editor to click on any subtitle segment to edit text, drag timeline markers to adjust timing, configure voice settings per speaker, then click "Regenerate" to apply audio changes instantly. All edits are free with no additional charges.
Video translation editing is the post-processing stage where raw AI dubbing output is reviewed and refined — correcting errors, adjusting timing, and configuring voice characteristics to meet professional standards.
AI translation engines handle standard text well but regularly miss technical terminology, idioms and culturally specific phrases (see our guide on common video translation mistakes), proper nouns, and humor and wordplay.
Different languages expand or compress text by 15–40% compared to English. German is typically 30–40% longer; Japanese is often significantly shorter. Manual fine-tuning is often needed for precise sync in fast-paced content.
The default AI voice assignment may not match your brand tone. The editor gives you full control over voice parameters — from stock voice selection to voice cloning.
VideoDubber.ai provides unlimited free edits on all translated projects — the entire edit-generate-review loop costs nothing beyond your existing subscription. Teams using AI dubbing platforms with free revision cycles complete localization projects 60–70% faster than traditional studio workflows.
| Editing feature | Cost |
|---|---|
| Subtitle text editing | Free |
| Timestamp adjustment | Free |
| Voice style selection | Free |
| Voice cloning assignment | Included |
| Audio regeneration after edits | Free |
| Unlimited revision cycles | Free |
| Video export | Per plan |
VideoDubber's editing suite covers subtitle correction, timing control, voice management, and audio regeneration — all accessible from a single three-panel interface without requiring external software.
| Feature | What it does | Where to find it |
|---|---|---|
| Click-to-edit subtitles | Edit any subtitle text directly in the timeline | Click on any subtitle segment |
| Side-by-side view | Shows original and translated text simultaneously | Subtitle panel, right column |
| Timestamp drag controls | Drag subtitle start/end markers on timeline | Timeline view below video player |
| Fine-tune +/- controls | Adjust timing by 0.1-second increments | Timestamp edit panel |
| Voice style selector | Choose from AI voice library | Voice Settings panel |
| Voice cloning toggle | Enable/disable voice cloning per speaker | Voice Settings > Voice Cloning |
| Speed adjustment | Change dubbing playback rate (0.8x-1.2x) | Voice Settings > Speed |
| Speaker labeling | Assign names and settings to individual speakers | Speaker Management panel |
| Audio regeneration | Regenerate dubbed audio after text/voice changes | "Regenerate" button |
| Real-time preview | Preview changes before regenerating full audio | Play button in editor |
Log in to app.videodubber.ai and your dashboard displays all recent translation projects. Projects show one of four states: Processing, Ready for Review, Published, or Editing. Click any project card to open the editor.
Access your translated projects from the main dashboard — click on any project to open the editor.
The editor loads with three panels: video preview (left), subtitle editor (center), and voice settings (right). The video auto-plays the dubbed version so you can immediately identify issues.
Subtitle editing is the most frequent editing task — fixing translation errors, adjusting wording for naturalness, and correcting proper nouns or technical terms the AI mishandled.
The VideoDubber editing panel — full control over subtitles, translations, and timing.
Play the video and pause when you hear an error, then click directly on the subtitle text in the timeline. The subtitle becomes editable immediately — type your correction, and changes save automatically. A "Regenerate" prompt appears when you're ready to apply new audio.
Open the Subtitle Panel and scroll through all segments chronologically. Each segment shows original text, translated text, timestamp, and speaker label. Side-by-side comparison makes errors far easier to spot than reviewing translated text alone.
| Issue | Example | Correct approach |
|---|---|---|
| Technical term mistranslation | "API endpoint" translated literally | Keep original technical term |
| Brand name changed | "iPhone" translated to a generic term | Restore original brand name verbatim |
| Idiom translated literally | "Break a leg" translated word-for-word | Replace with target-language equivalent idiom |
| Number format mismatch | "1,000,000" shown as "1.000.000" | Adjust to target locale format |
| Proper noun incorrectly handled | Person's name translated/changed | Restore original proper noun |
| Overly formal register | Casual source script translated formally | Adjust to match the original tone level |
When dubbed audio runs longer or shorter than the video action, timing adjustments restore sync. Languages expand or compress 15–40% compared to English, as discussed in our guide on common video translation mistakes.
In the Timeline View, hover over the edge of a subtitle block — the cursor changes to a resize arrow. Drag left or right to adjust start/end points, then play to verify. Best for large corrections (0.5+ seconds).
Click a subtitle segment and use the +/- buttons in the timestamp panel to adjust by 0.1-second increments. You can also type exact timestamp values directly. Preferred for content with tight visual cues.
| Standard | Value | Why it matters |
|---|---|---|
| Reading speed | 150–180 words per minute | Viewers need time to read without pausing |
| Minimum display time | 1.0 seconds | Shorter flashes too fast to register |
| Maximum line length | 42 characters per line | Prevents overflow on standard screens |
| Subtitle gap | 0.2-0.5 seconds between segments | Prevents visual merge of consecutive subtitles |
| Pre-speech offset | 0.0-0.2 seconds before audio | Subtitle appears just before speech |
| Post-speech fade | 0.0-0.3 seconds after audio ends | Allows reading completion |
Voice configuration determines whether the dubbed version feels authentic or robotic to native speakers — covering voice model selection, voice cloning, and speaking rate per speaker.
The "Choose Voiceover for Speakers" dialog — configure Speaker Name, Voice Style, and Voice Cloning options.
Label each speaker with a descriptive name ("Presenter," "Host," or role labels). Named speakers are managed independently with different voice settings for each.
| Voice type | Best content match |
|---|---|
| Natural Male — Professional | Corporate videos, product demos, tutorials |
| Natural Female — Warm | Educational content, wellness, support videos |
| Young/Energetic | Social media content, entertainment, sports |
| Mature/Authoritative | Documentaries, news summaries, legal content |
| Conversational | Podcast-style content, interviews |
Voice cloning generates dubbed audio that sounds like the same person speaking the target language. See our guide on how to clone celebrity voices for video dubbing for the complete workflow. 68% of viewers report higher trust in dubbed content when the original speaker's voice is preserved.
| Voice Cloning setting | Effect | Recommended for |
|---|---|---|
| On | Dubbed audio sounds like the original speaker | Personal brands, CEO messages, instructors |
| Off | Dubbed audio uses selected AI stock voice | Content where speaker identity is not important |
Stay between 0.75x and 1.25x for natural-sounding output.
| Speed setting | When to use |
|---|---|
| 0.8x | Complex technical content; language that expanded significantly |
| 1.0x | Standard — use for most content |
| 1.2x | Recap content, fast-paced promotional videos |
Audio regeneration re-synthesizes voiced audio from an updated transcript, applying current voice style and cloning settings to produce a new audio track reflecting all changes.
The system automatically detects changes and prompts you to regenerate audio with updated translations.
You can regenerate audio for individual segments (fastest), all changes at once (batch), or the full project (useful after major changes). Batch all text edits before triggering regeneration for maximum efficiency.
| Video length | Partial regeneration (1-5 segments) | Full project regeneration |
|---|---|---|
| Under 5 minutes | 10–30 seconds | 1-3 minutes |
| 5-15 minutes | 15–45 seconds | 3-8 minutes |
| 15-30 minutes | 20–60 seconds | 8-20 minutes |
| 30-60 minutes | 30–90 seconds | 20-40 minutes |
Following this sequence eliminates redundant work and cuts total editing time by 40–50%.
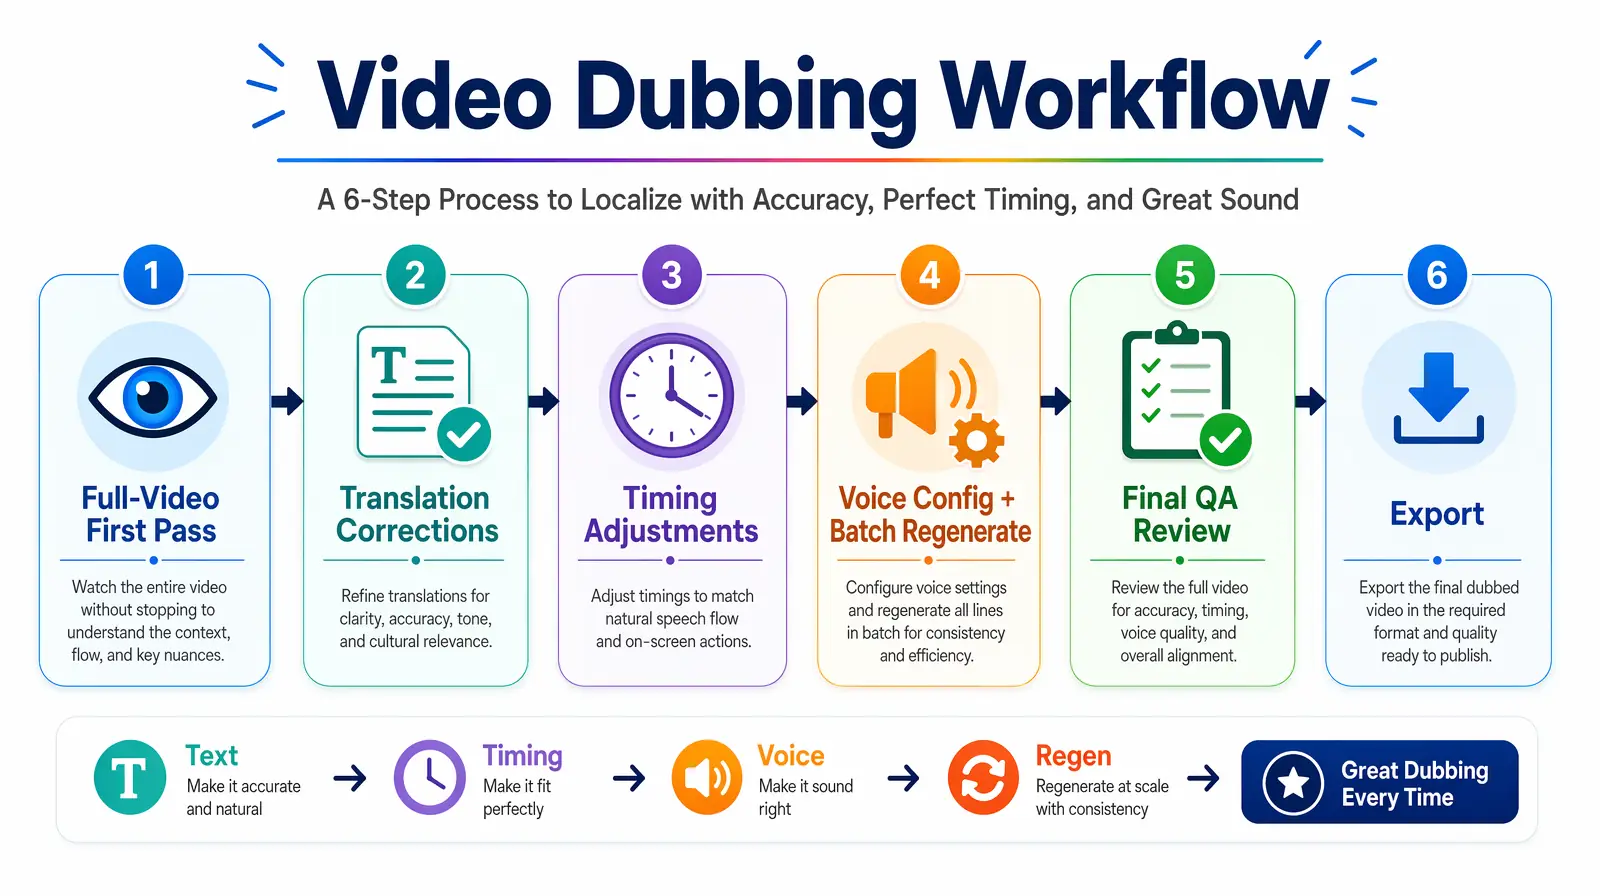
A strict text-then-timing-then-voice-then-regenerate sequence avoids redundant audio re-synthesis and cuts end-to-end edit time by nearly half.
Watch the entire dubbed video at normal speed, taking notes on issues but not stopping to fix them.
Fix all translation errors chronologically. Fix text before timing, since text changes affect audio length. Priority order: (1) meaning-changing errors; (2) unnatural phrasing; (3) stylistic preferences.
Adjust timing segment by segment. Complete text corrections first so timing adjustments use the final audio length.
Confirm voice cloning, voice style, and speed settings for all speakers. Then trigger batch regeneration of all modified segments.
Watch the complete dubbed video one more time using this checklist:
Download the final video in your required format and resolution.
Multi-speaker dubbing editing involves verifying AI speaker diarization, correcting mislabeled segments, and assigning appropriate voice settings to each identified speaker.
VideoDubber automatically identifies speaker changes and assigns temporary labels (Speaker 1, Speaker 2, etc.). Rename these in Speaker Management: click each label, rename it, then assign voice styles or clones. Changes apply to all segments with that speaker label.
AI diarization may mislabel speakers during overlapping speech, short interjections, or background voices. To re-assign: select the segment in the Subtitle Panel, change the Speaker label from the dropdown, and the segment uses that speaker's voice configuration going forward.
| Content type | Voice assignment approach |
|---|---|
| Interview | Clone main host; use distinct stock voice for guest |
| Product demo with co-presenter | Clone both speakers for brand consistency |
| Webinar with Q&A | Clone presenter; use generic voice for questions |
| Documentary with narrator + subjects | Clone narrator; assign regional voices to subjects |
If you adjust voice style and regenerate, then fix translation errors, you must regenerate again — doubling processing time. Always complete all text corrections before any audio regeneration.
Batch all text edits together, then regenerate once. Save segment-by-segment regeneration for quick single-fix verifications only.
If you increase voice speed, timing that looked correct at 1.0x may need adjustment at 1.2x. Set voice speed before doing precision timing work.
A translation that reads correctly in isolation may change meaning when compared to the original — especially for conditional statements, negations, and technical specifications. Use side-by-side view for every review pass.
Segment-by-segment editing catches individual issues but can miss flow breaks, tonal shifts, or compounding timing errors. Never skip the final QA review.
Tools like VideoDubber generate final export files that include the dubbed audio track, optional burned-in subtitles, a separate SRT file, and AI lip-sync adjustments — everything needed to publish without additional post-processing.
| Export format | Best for |
|---|---|
| MP4 (H.264) | YouTube, social media, web embedding |
| MP4 (H.265/HEVC) | Higher quality at smaller file size; streaming platforms |
| Original format | Match source video format for archival or re-editing |
For YouTube and other platforms, also update the title, description, tags, and thumbnail text in the target language. Localized metadata directly affects how the video ranks in target-language search results. For a complete guide on avoiding errors, revisit common video translation mistakes before publication.
VideoDubber.ai offers unlimited free edits on all translated projects. There is no limit on text edits, timing adjustments, voice changes, or audio regeneration. You pay only for initial translation processing, not subsequent revisions.
No — make multiple text edits across many segments, then trigger a single batch regeneration. The platform queues changes and processes them all at once when you click "Regenerate."
All projects remain in your dashboard indefinitely within plan storage limits. Open the project and the editor loads with all previous changes intact. No re-uploading required.
Changing target language requires a new translation project — edits are not transferable between languages. However, you can create multiple translation projects from the same source video for different target languages.
VideoDubber supports MP4 (H.264), MP4 (H.265/HEVC), and original format. SRT subtitle files are available as a separate download. Contact support for enterprise formats including WebM, MOV, or broadcast-spec.
Use the voice speed control at 0.9x, review subtitle timing for adequate display time, and consider re-recording source at 120–150 words per minute for cleanest dubbing results across all target languages.
Yes — in the Subtitle Panel, click the "+" button at the desired timeline position, type translated text, set the timestamp, and it will be included in the next audio regeneration.
Voice cloning uses the original speaker's voice sample to generate dubbed audio preserving their unique tone and character. Voice style selection chooses from pre-built AI voices. Use cloning when speaker identity matters (instructors, executives, personal brands); use style selection when tone matters more than identity.

With a background in AI and a passion for clear technical communication, I enjoy breaking down complex tools and processes. Exploring new software and sharing insights is a key focus.
How to translate videos to multiple languages with AI dubbing in minutes. Step-by-step workflow, cost data, voice cloning tips, and distribution strategy.
Change speaker voices in video translation with step-by-step workflows for voice assignment, instant cloning, and Pro+ voice cloning. Full 2026 guide.
Learn what video translation and AI dubbing are, how they work, and why VideoDubber.ai is the best solution for translating videos while preserving voice, tone, and emotion. Complete guide covering benefits, use cases, and best practices.
Upscale image quality online with AI in seconds. Step-by-step guide, tool comparison, 2×/4× tips, and how to avoid blur. Free options, print & 4K covered. Try VideoDubber.
Explore the best SRT translators for video translation in 2024. Discover tools that help convert subtitles into multiple languages and learn how video dubbing solutions can elevate your content for global audiences.