How to Record with OBS Studio: The Complete 2026 Guide for Creators and Businesses
April 24, 2026 29 mins read
OBS Studio is the most widely used free recording and streaming software in the world — yet most users barely scratch the surface of what it can do. Whether you want to record a product demo, capture a game session, produce a tutorial series, or build a full streaming setup from scratch, OBS gives you professional-level control at zero cost, with no watermarks, no time limits, and no subscription fees.
OBS Studio (Open Broadcaster Software) is a free, open-source video recording and live streaming application that runs on Windows, macOS, and Linux. It supports multi-source scene composition, real-time audio mixing, hardware encoding, and direct streaming to platforms including YouTube, Twitch, and Facebook. As of 2026, OBS is trusted by tens of millions of creators, educators, businesses, and gamers worldwide — making it the de facto industry standard for anyone who needs professional-quality recordings without a professional budget.
This guide covers installation, configuration, advanced settings, troubleshooting, and pro techniques. By the end, you'll know how to set up OBS from scratch, configure video and audio for your specific use case, and use advanced workflows that separate polished productions from raw captures.
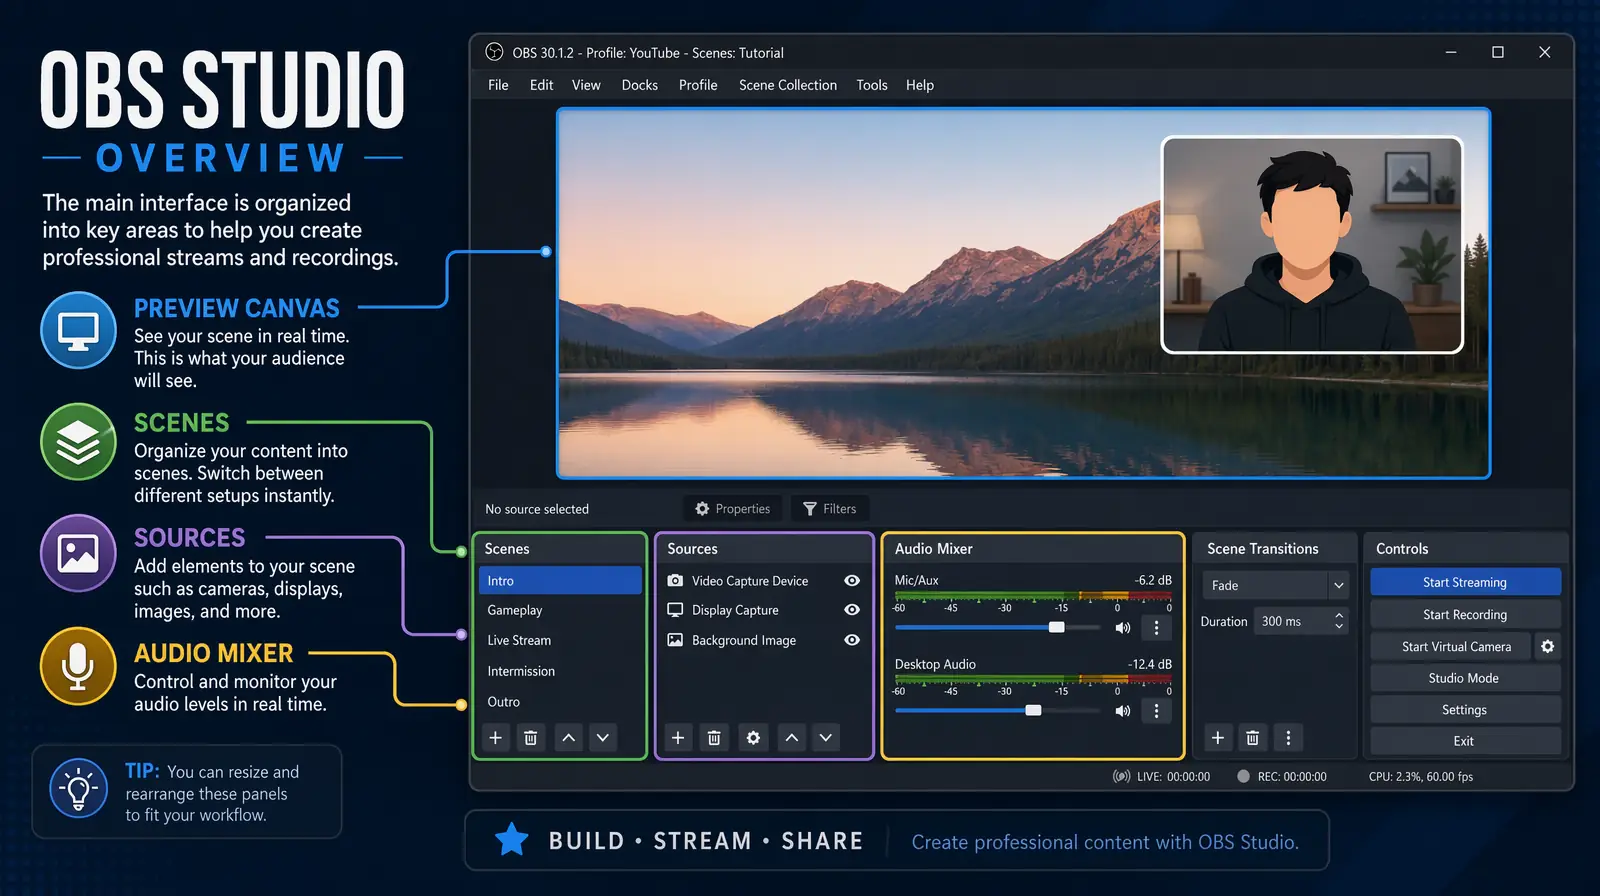
The OBS Studio main interface, showing the Scenes panel, Sources panel, and real-time Audio Mixer — the three controls most creators use daily.
| Question | Section |
|---|---|
| What is OBS Studio and who should use it? | What Is OBS Studio? |
| How do I install and set up OBS on Windows, Mac, or Linux? | How to Install OBS Studio |
| What are the step-by-step instructions to record with OBS? | Step-by-Step: How to Record with OBS |
| How do I configure video, audio, and output settings? | OBS Settings: Video, Audio, and Output |
| What are Scenes and Sources in OBS? | Understanding Scenes and Sources |
| What pro tips improve OBS recording quality? | Pro Tips for Higher-Quality OBS Recordings |
| What are the best OBS plugins in 2026? | Best OBS Plugins in 2026 |
| What OBS recording mistakes should I avoid? | Common Mistakes to Avoid |
| How can I reach a global audience with my OBS recordings? | Expanding Your Reach: Translating OBS Recordings |
| Frequently asked questions about OBS recording | Frequently Asked Questions |
OBS Studio is a free, open-source application for video recording and live streaming that has become the industry standard for creators, educators, gamers, and businesses. It was originally developed for gamers who wanted to stream their sessions to Twitch and YouTube, but has since evolved into a comprehensive production suite used across industries — from enterprise training departments to independent podcast studios. Unlike consumer screen recorders like QuickTime or Xbox Game Bar, OBS gives you granular control over every element of your recording: source layout, audio routing, encoding parameters, and real-time scene composition.
The key advantages that set OBS apart from alternatives include:
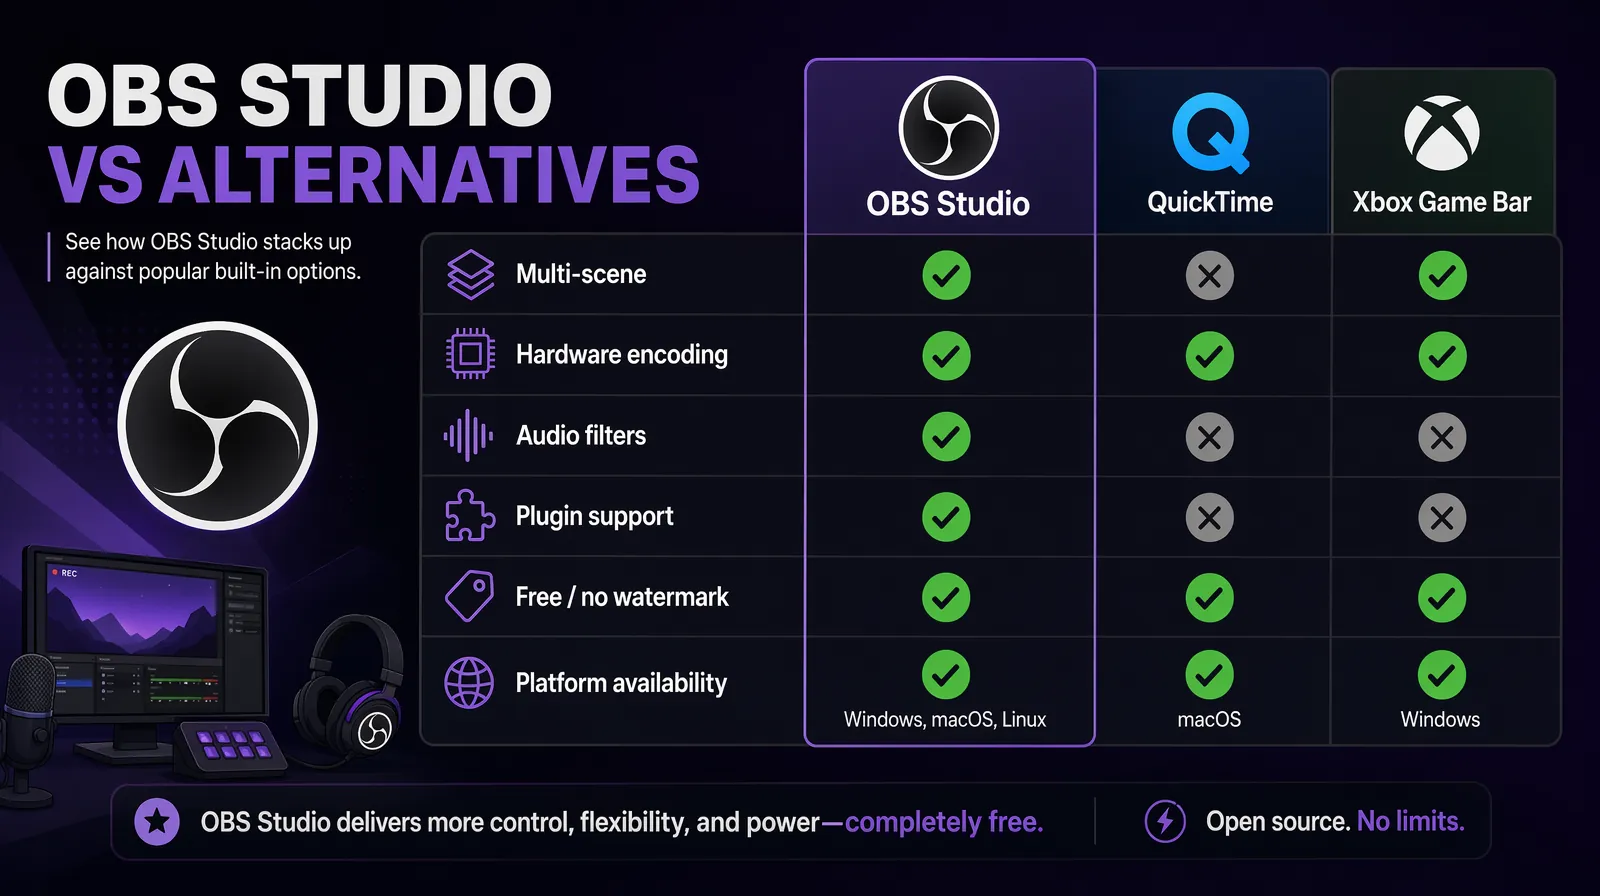
Feature comparison showing why OBS Studio outclasses built-in screen recorders for serious creators and businesses.
| User Type | Primary Use Case | Key OBS Feature |
|---|---|---|
| YouTubers / Content Creators | Tutorial videos, gaming content, vlogs | Multi-scene layouts, webcam overlay |
| Businesses | Product demos, training videos, webinars | Window/Display Capture + logo overlay |
| Educators | Online lectures, screencasts, course content | Screen share + presentation mode |
| Streamers | Live streaming on Twitch, YouTube, Facebook | Stream key integration, alert overlays |
| Marketers | Promotional videos, product walkthrough clips | Branded overlays, scene presets |
| Podcasters | Video podcasts, interview recordings | Multi-webcam + audio mixing |
OBS Studio is available for free download at obsproject.com. Installation typically takes under three minutes on any modern system, and the setup wizard handles most of the configuration work automatically — making it accessible even to first-time users.
| Platform | Minimum Requirements | Recommended |
|---|---|---|
| Windows | Windows 10 (64-bit), 4 GB RAM, DirectX 11 GPU | Windows 11, 16 GB RAM, dedicated GPU |
| macOS | macOS 11 Big Sur, Apple Silicon or Intel | macOS 13+, Apple M-series chip |
| Linux | Ubuntu 20.04+ or equivalent | Latest LTS release, 8 GB RAM |
The Auto-Configuration Wizard is one of OBS's most underrated features. It stress-tests your CPU and GPU, determines which encoder performs best on your machine, and recommends bitrate and resolution settings automatically — saving hours of manual trial and error that otherwise trips up new users. In practice, most systems end up with either NVENC hardware encoding (NVIDIA GPUs) or x264 software encoding, with bitrate set appropriately for the detected performance tier.
Scenes in OBS are like layouts or "camera setups" — each scene defines what appears in your recording frame and can contain any combination of sources. You can create multiple scenes and switch between them instantly during a recording or live stream, making OBS far more flexible than single-source screen recorders.
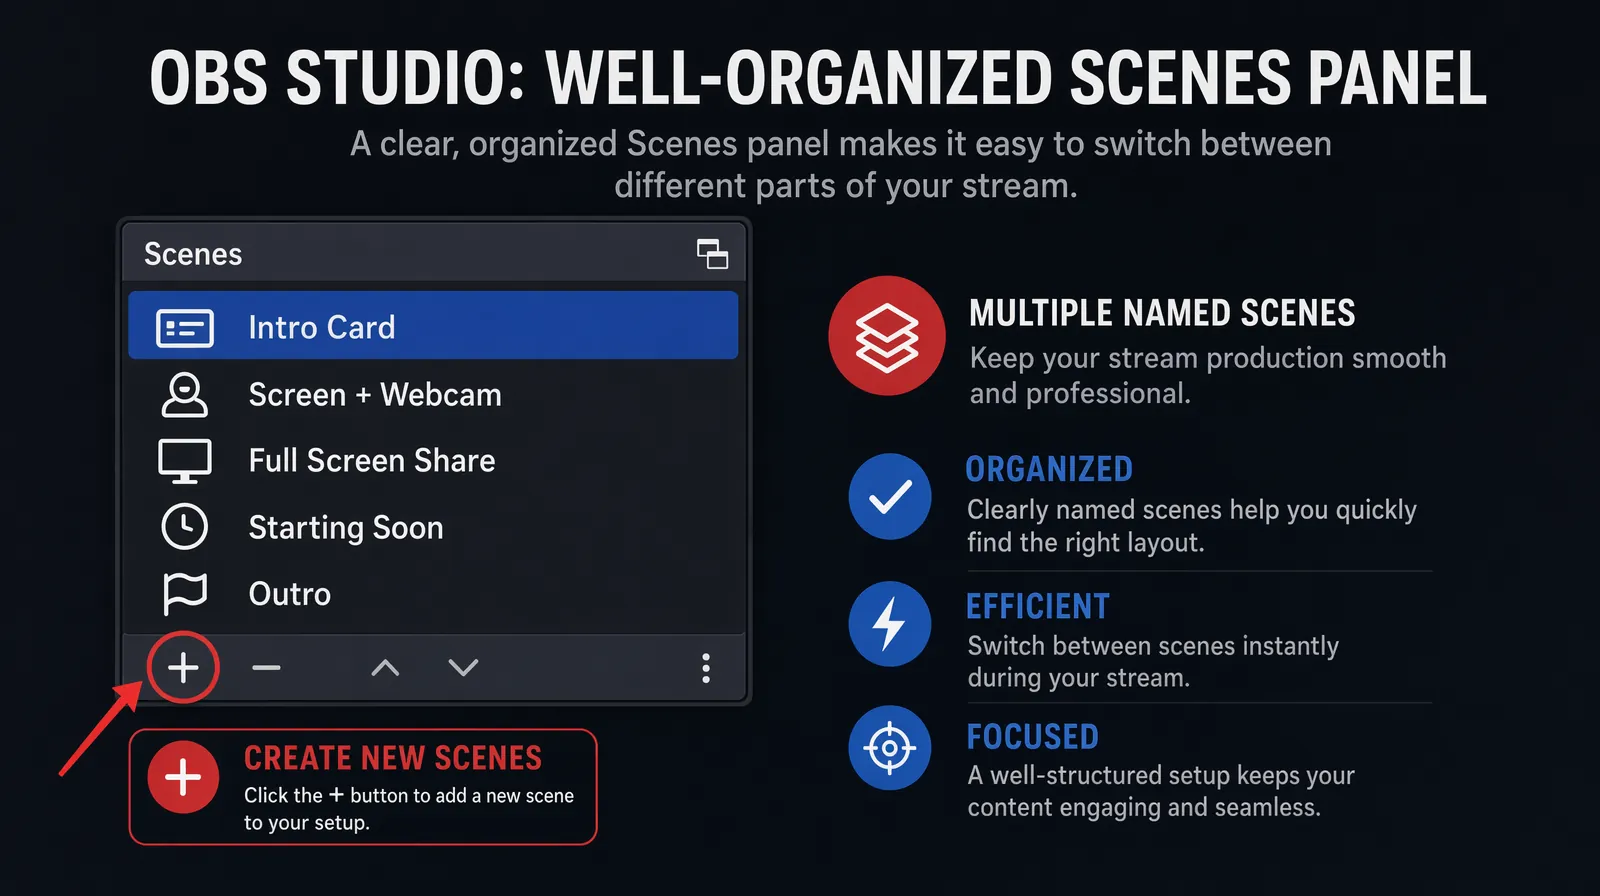
A well-organized Scenes panel with named, purpose-driven scenes makes live switching and post-production dramatically easier.
In practice, most creators build 2–4 scenes: one for full-screen content, one with a webcam overlay, one for transitions, and optionally a "Starting Soon" or "Break" screen for streamers. This multi-scene approach allows clean, professional-looking productions even when you're recording solo with no video editor present.
Sources are the content layers that appear within each scene — your webcam feed, screen capture, image overlay, or browser source. Click the "+" in the Sources panel to add any of the following types:
| Source Type | What It Captures | Best For |
|---|---|---|
| Display Capture | Your entire monitor | Presentations, software demos, browser-based content |
| Window Capture | A single application window | Focused software tutorials, avoiding accidental screen reveals |
| Game Capture | Full-screen games | Gaming content; lower performance overhead than Display Capture |
| Video Capture Device | Your webcam or external camera | Talking-head overlay, face cam, podcast recording |
| Audio Input Capture | Microphone | Voice narration, interviews |
| Audio Output Capture | System audio (music, app sounds) | Recording audio from apps or games |
| Image | A static image file | Logos, watermarks, lower-thirds, overlays |
| Media Source | Video files or looping background clips | Intro/outro animations, background content |
| Browser Source | A URL rendered in real-time | Chat overlays, alerts, live social feeds |
| Text (GDI+) | Typed text rendered on screen | Titles, captions, live stats |
Arrange sources by drag-and-drop in the Sources list — sources at the top of the list appear in front of sources below them. Resize and reposition each source directly on the preview canvas by clicking and dragging the corner handles until your composition looks right.
Audio setup is the step most beginners rush through — and the one that most visibly separates professional-quality recordings from amateur ones. Start by going to Settings > Audio and setting Desktop Audio to your system audio output (to capture audio from apps and media) and Mic/Auxiliary Audio to your microphone. In the main OBS window, the Audio Mixer panel shows volume sliders for each active audio source — use these to balance levels while monitoring the meters in real time.
Right-click any audio source in the Audio Mixer and select "Filters" to add processing. Audio filters take about two minutes to configure and make a dramatic, immediately audible difference in recording quality — even with an inexpensive microphone:
| Filter | What It Does | When to Use |
|---|---|---|
| Noise Suppression | Removes background hiss and ambient noise | Always — even with high-quality mics |
| Noise Gate | Silences audio below a threshold (cuts out room noise between sentences) | Noisy recording environments |
| Compressor | Evens out loud and quiet audio automatically | For voices with variable speaking volume |
| Limiter | Hard caps the volume at a set ceiling | Prevents clipping from unexpected loud sounds |
| Gain | Amplifies a quiet source | For mics that record at too low a level |
| EQ (Equalizer) | Boosts or cuts specific frequency ranges | For improving microphone tone quality |
A basic filter chain of Noise Suppression → Compressor → Limiter will dramatically improve microphone quality for the vast majority of recording setups, regardless of room acoustics. Apply this chain before your first serious recording session.
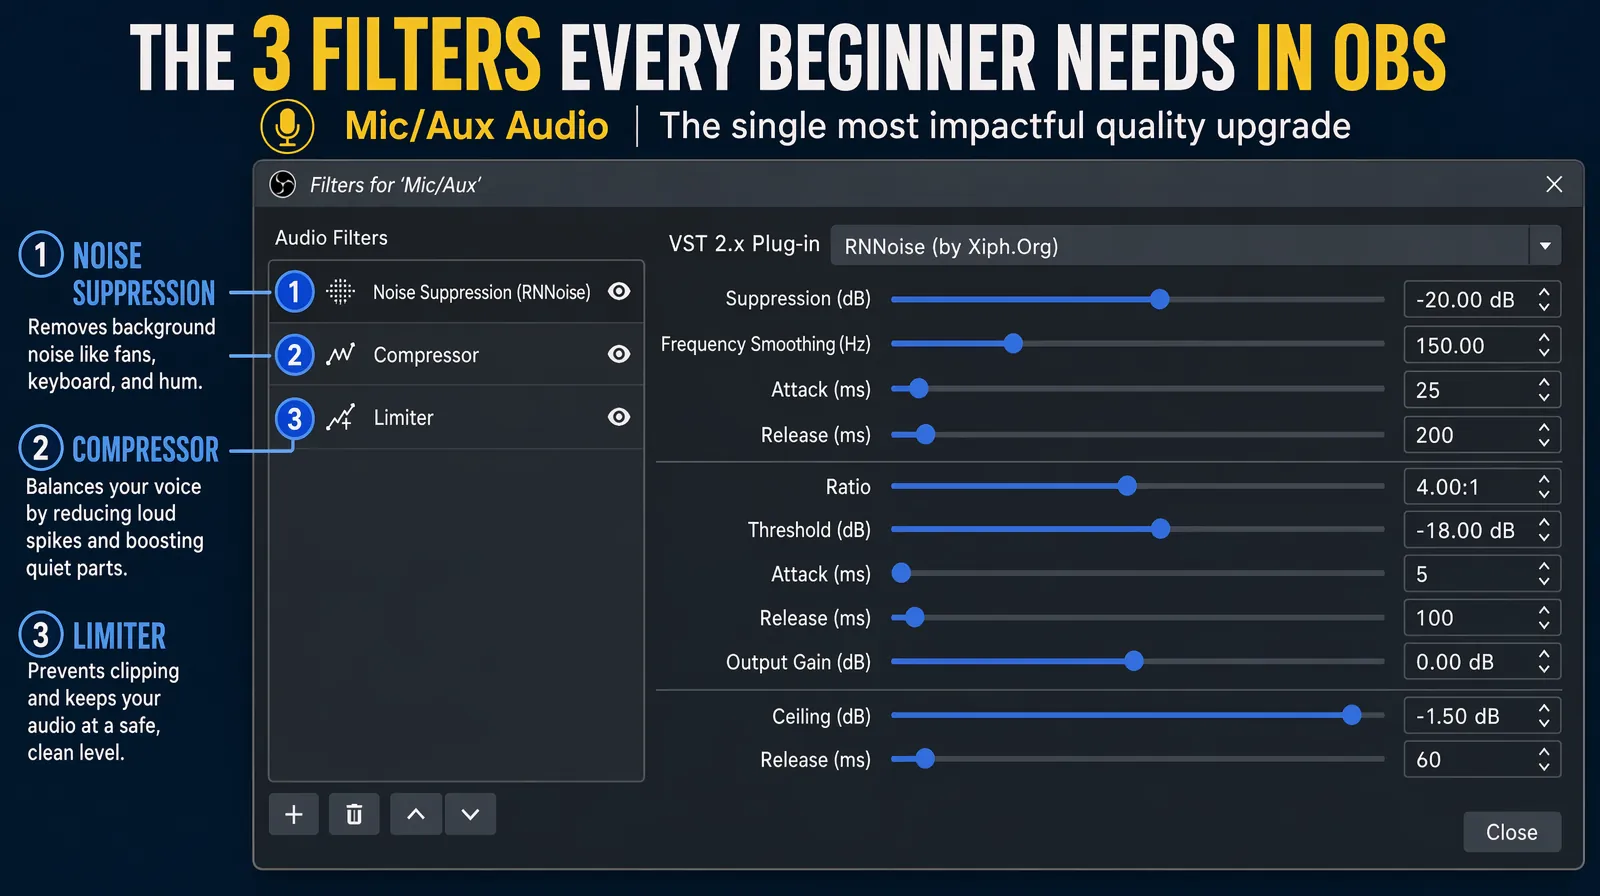
The recommended three-filter audio chain — Noise Suppression → Compressor → Limiter — transforms cheap microphone audio into broadcast-quality sound.
Navigate to Settings > Output and set Output Mode to "Advanced" for full control — or keep "Simple" for a quicker, guided setup. Under the Recording tab, configure these key options:
Then navigate to Settings > Video to finalize your resolution and frame rate:
| Setting | Recommended Value | Notes |
|---|---|---|
| Base (Canvas) Resolution | Match your monitor (1920×1080 or 2560×1440) | Source resolution — should match your display |
| Output (Scaled) Resolution | 1920×1080 for most content | Downscale if needed for performance |
| Downscale Filter | Lanczos (best quality) or Bilinear (fastest) | Use Lanczos for final delivery quality |
| Common FPS | 30 FPS (general) or 60 FPS (gaming/fast motion) | 60 FPS roughly doubles output file size |
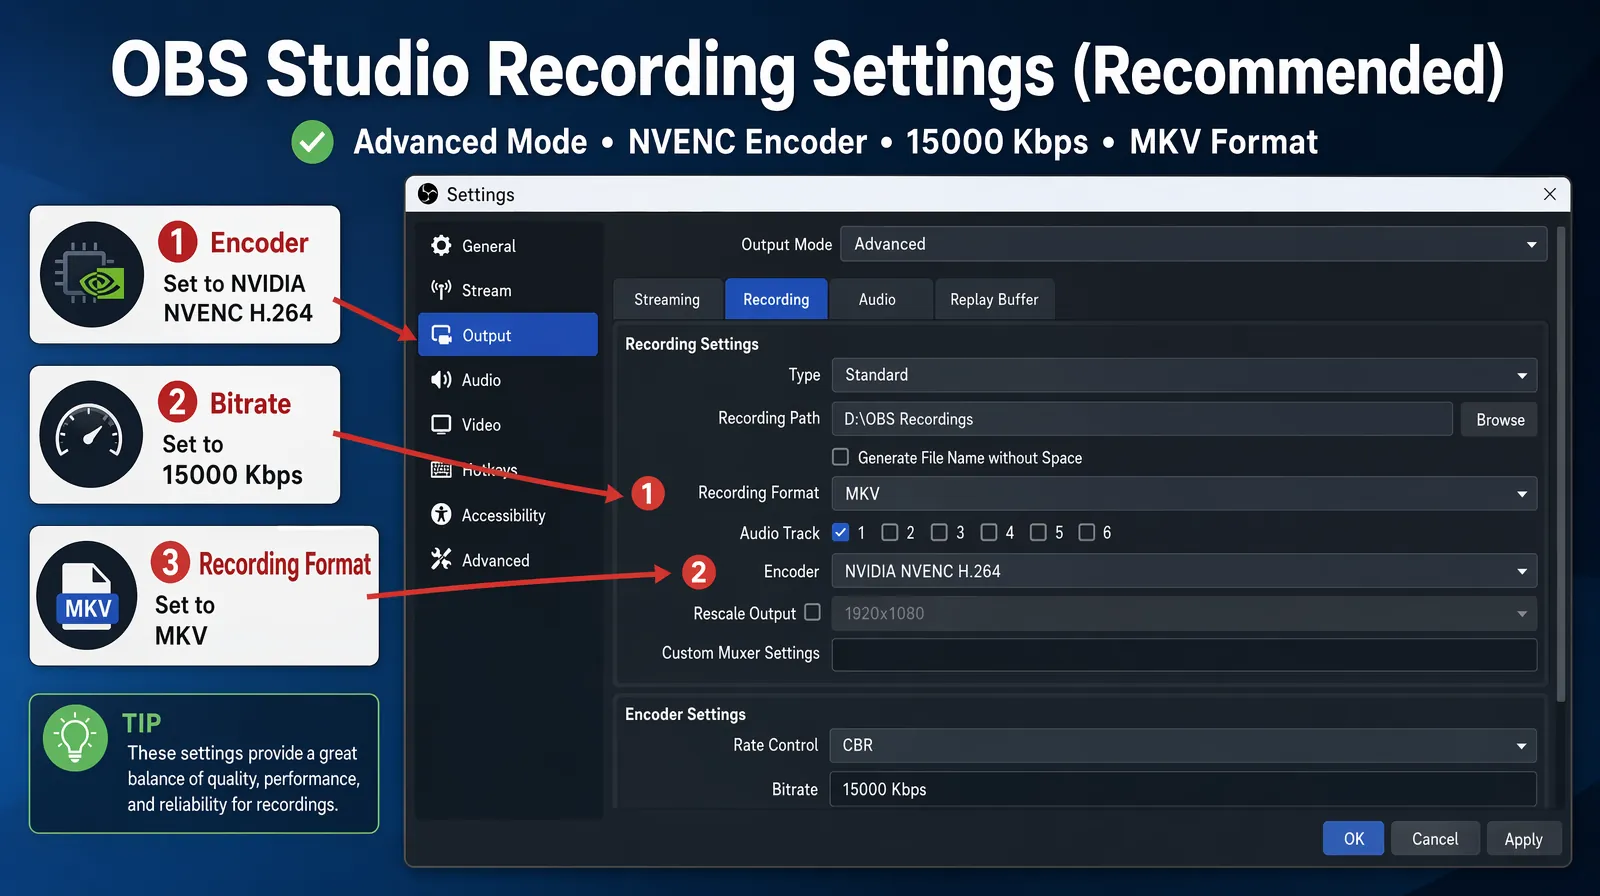
Configuring the Output tab with hardware encoding (NVENC), MKV format, and a 15,000 Kbps bitrate for optimal 1080p quality.
With your scenes, sources, and settings configured, starting a recording is simple. Click "Start Recording" in the Controls panel (bottom right). A red recording indicator appears in the status bar at the bottom of the OBS window, confirming the session is active. Record your content, then click "Stop Recording" when finished — OBS automatically saves the file to the folder you designated in Settings > Output.
| Use Case | Resolution | FPS | Bitrate (Recording) | Encoder |
|---|---|---|---|---|
| Tutorial / software demo | 1920×1080 | 30 | 12,000–20,000 Kbps | NVENC or x264 |
| Gaming content | 1920×1080 | 60 | 20,000–40,000 Kbps | NVENC (GPU) |
| Podcast / talking head | 1920×1080 | 30 | 8,000–15,000 Kbps | Any |
| Presentation recording | 1920×1080 | 30 | 8,000–12,000 Kbps | Any |
| 4K content (high-end systems) | 3840×2160 | 30 | 40,000–80,000 Kbps | NVENC / VT (Mac) |
| Setting | Recommended Value |
|---|---|
| Sample Rate | 48 kHz (standard for video) |
| Channels | Stereo |
| Mic gain level | Peaks at –12 dB to –6 dB on the meter |
| Desktop audio level | –6 dB to –3 dB (slightly below mic) |
Choosing the right bitrate is one of the most impactful decisions for recording quality. Higher bitrates preserve more detail — especially in fast-moving content like gaming — but they increase file size proportionally. At 20,000 Kbps, OBS produces roughly 150 MB per minute of 1080p/60fps video. A 60-minute recording session generates approximately 9 GB, so plan your storage accordingly before long training sessions or streaming archives.
Scenes and Sources are the core organizational concepts in OBS Studio, and understanding how they interact unlocks everything from simple screen recordings to complex live productions with multiple camera angles, animated overlays, and dynamic scene transitions.
A Scene is a complete "layout" or snapshot — it defines exactly what the viewer sees in the recording frame at any given moment. You can have as many scenes as you need, and switch between them with a single hotkey press or mouse click, even mid-recording. A Source is a content layer within a scene — your webcam feed, screen capture, image overlay, or browser source. The power of OBS's scene/source model is that multiple scenes can share the same source: for example, the same webcam source can appear in both your "Full Screen" scene and your "Side-by-Side" scene, so repositioning the webcam once updates it everywhere.
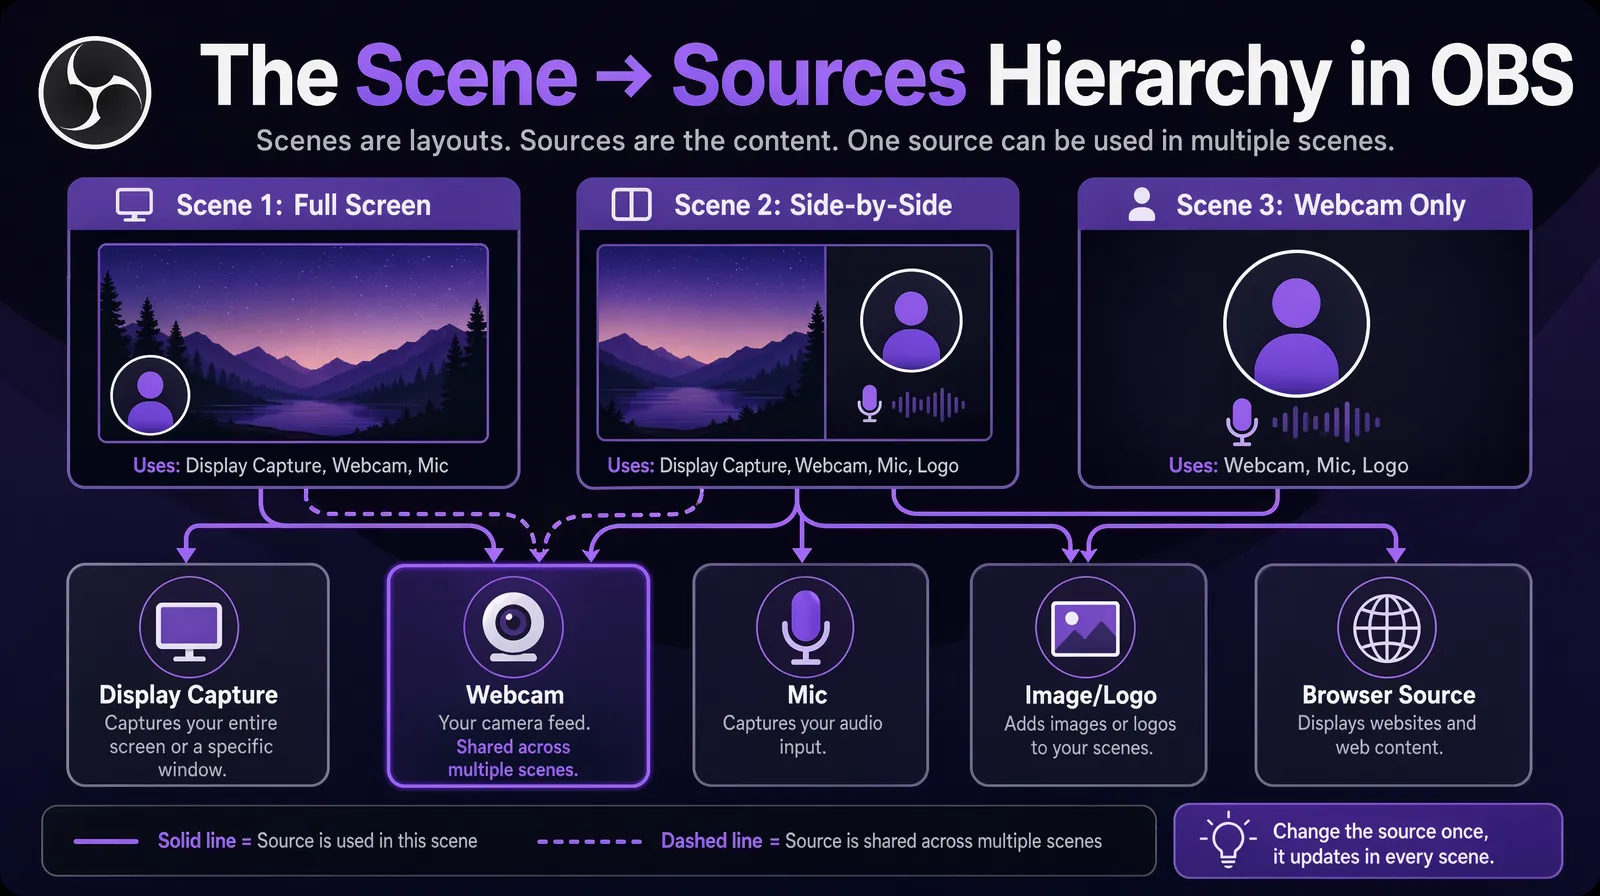
Visual model of the Scene/Source hierarchy — each Scene is a reusable layout composed of layered Sources that can be shared across scenes.
| Scene Name | Sources Included | Use Case |
|---|---|---|
| Full Screen Share | Display Capture + Mic + Desktop Audio | Clean screencasts, presentations |
| Webcam + Screen | Display Capture + Video Capture Device (bottom-right corner) + Mic | Tutorials with face cam overlay |
| Webcam Only | Video Capture Device (full screen) + Mic | Talking-head intros/outros |
| Starting Soon | Image (branded graphic) + Media Source (looping animation) + Music | Pre-stream waiting screen |
| Game Capture | Game Capture + Webcam (top-right) + Mic + Desktop Audio | Gaming streams or recordings |
Configure hotkeys under Settings > Hotkeys for all critical actions — Start/Stop Recording, Mute/Unmute Mic, Switch Scenes, and Push-to-Talk (if preferred over an open mic). Hotkeys let you control OBS without clicking away from your recording context, keeping the composition clean and removing the distraction of mouse movement over your screen capture. This is especially important for tutorial recordings where viewers will notice every on-screen action you take.
Rather than one long continuous take, break recordings into individual segments per topic or chapter. This approach offers several compounding advantages: easier post-production editing, a safety net against crashes (at most one segment lost), and better audience retention since shorter focused clips perform measurably better on YouTube and social platforms. Teams that implement segment recording for webinars and training videos typically reduce post-production time by 40–60% compared to editing a single long take, according to common production workflow analyses.
Use OBS's Image and Browser sources to add professional branding directly into your recordings — a semi-transparent logo watermark in a corner, lower-third name tags via a Text (GDI+) source or a Browser Source pointed at a streaming overlay tool, and branded title cards for scene transitions. In practice, even a simple logo overlay significantly lifts perceived production quality. A digital agency recording client demos reports that branded OBS recordings create a notably more professional first impression compared to plain screen captures — an impression that matters for sales demos and client-facing training materials.
OBS's built-in Virtual Camera (Tools > Start Virtual Camera) makes your fully composed OBS scene appear as a standard camera input in Zoom, Teams, Google Meet, and other conferencing apps. This powerful feature lets you broadcast a multi-source OBS layout — with overlays, branded graphics, audio filters, and multi-camera composition — directly into a live video call or recorded meeting, without any additional hardware or third-party software. It's particularly valuable for presenters who want a polished on-camera appearance during client calls or webinars.
At 20,000 Kbps bitrate (recommended for 1080p/60fps), OBS generates approximately 150 MB per minute of video. A 60-minute recording produces roughly 9 GB. Plan your storage allocation before long training sessions, conference recordings, or streaming archives — running out of disk space mid-recording is a common and entirely preventable failure point. Consider using an external SSD or a dedicated recording drive with at least 500 GB of available space for any session longer than 30 minutes.
OBS Studio's plugin ecosystem extends its capabilities significantly beyond the base installation. These are the most valuable plugins for creators and businesses in 2026:
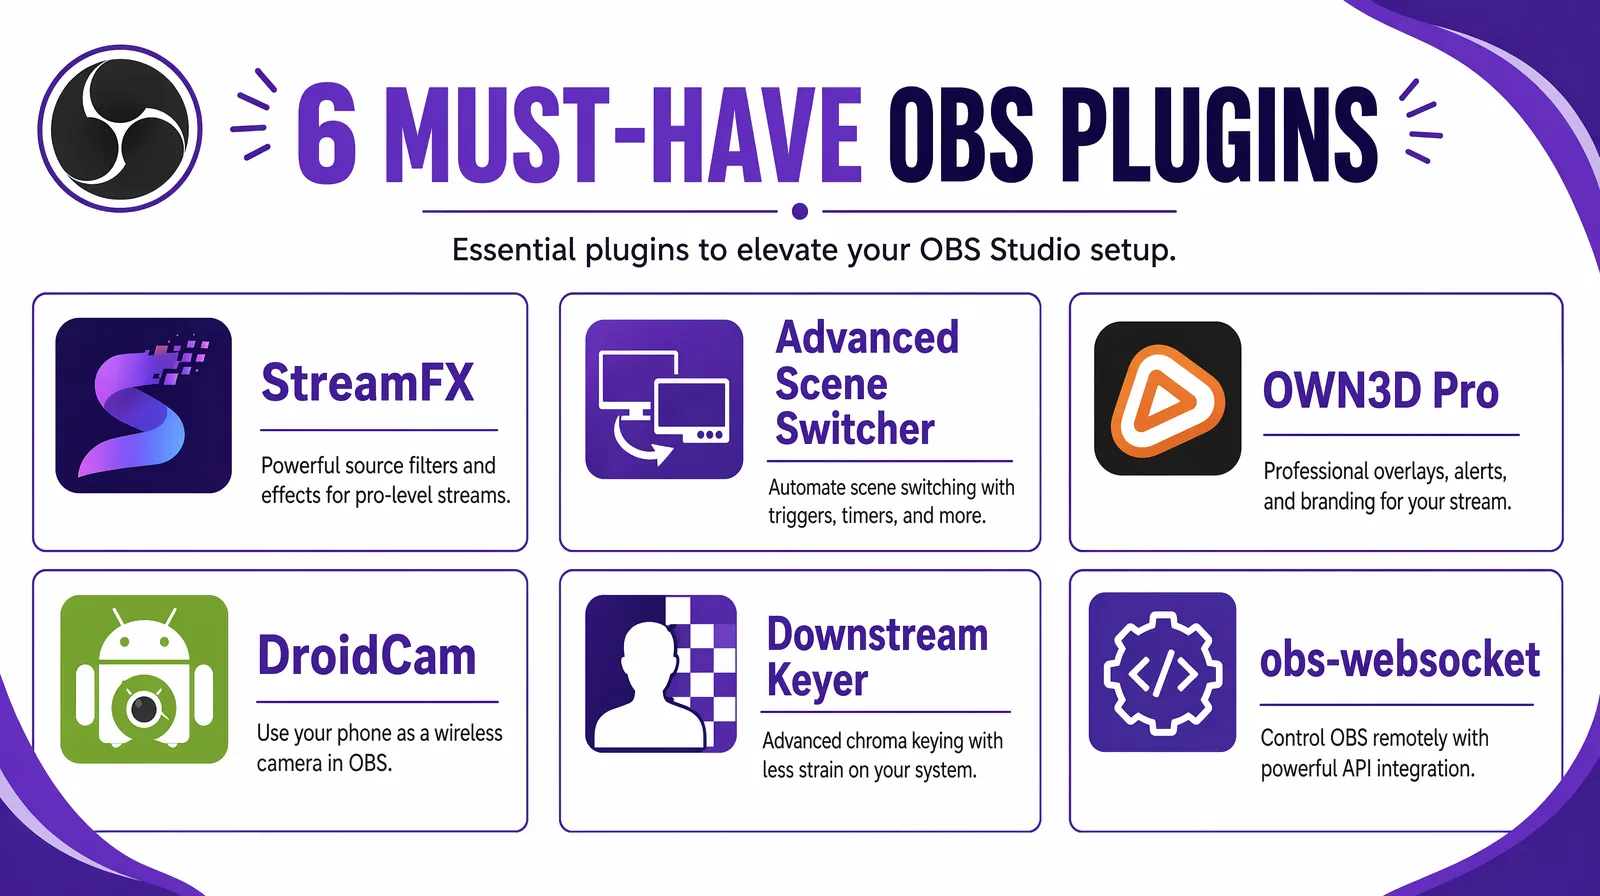
The 2026 OBS plugin ecosystem adds advanced visual effects, scene automation, branded overlays, and remote API control.
| Plugin | What It Does | Best For |
|---|---|---|
| StreamFX | Advanced visual effects — 3D transforms, dynamic masks, blur filters | Creative scene compositions |
| Advanced Scene Switcher | Automates scene changes based on triggers (window focus, idle time, custom schedules) | Live streaming, complex multi-scene productions |
| OWN3D Pro | Library of professional animated overlays, alerts, and stream labels | Branded streaming setups |
| DroidCam Virtual Output | Use your smartphone as a wireless webcam source | Flexible camera setups without expensive hardware |
| Downstream Keyer | Adds a persistent overlay layer above all scenes without modifying each scene individually | Persistent watermarks, global lower-thirds |
| obs-websocket | Remote control OBS via API | Automation, custom dashboards, integration with stream decks |
Install plugins by downloading from their respective sites and placing the plugin files in OBS's plugin directory (C:\Program Files\obs-studio\obs-plugins on Windows; ~/Library/Application Support/obs-studio/plugins on macOS). After placing files, restart OBS and the plugin will appear in the Tools menu or as a new source type depending on the plugin's function.
Learning to record with OBS involves a predictable set of beginner mistakes. Based on common patterns from new OBS users, these are the most frequent — and fixable — issues:
Wrong frame rate or resolution — recording at 60 FPS when your source content is 30 FPS wastes file space without quality benefit. Match your output FPS to your content type: 30 FPS for tutorials, presentations, and talking-head videos; 60 FPS for gaming or any content with fast motion. The difference in file size between 30 and 60 FPS is roughly 2× at the same bitrate.
Not separating audio tracks — mixing mic and system audio on the same recording track makes it impossible to adjust levels or remove background noise in post-production without affecting both. Always assign your microphone to Track 1 and desktop audio to Track 2 in the Advanced Audio Properties panel. This two-minute setup step saves hours in editing.
Overloaded single scene — putting all sources in one scene creates a cluttered, hard-to-manage layout and can slow down OBS's rendering. Use multiple focused scenes and switch between them — one for screencasts, one for webcam close-ups, one for title cards — and keep each scene's source list short and purposeful.
Skipping audio filters — recording without Noise Suppression and Compression results in audio that sounds noticeably amateur compared to the video quality. Audio filters take under two minutes to apply and make a large, immediately audible difference. The Noise Suppression → Compressor → Limiter chain should be standard on every microphone source.
Not syncing audio and video — if your webcam audio and video are out of sync, open the Video Capture Device properties and add a fixed audio offset (in milliseconds) to compensate. Check sync by clapping on camera and verifying that the clap's audio peak aligns with the visual hand movement in the recorded file.
Forgetting to set the recording path — OBS saves to its default folder (typically the Videos folder) until you manually change the path in Settings > Output. Before your first important recording, set the output path to a dedicated folder on a drive with ample storage space and confirm the path is correct.
OBS recordings are only as valuable as the audience they reach. For businesses and creators targeting international audiences, translating your OBS recordings into multiple languages is the highest-leverage distribution step available after production — and it requires no re-recording, no studio time, and no additional hardware.
Video translation converts your English-language OBS recording into dubbed versions in Spanish, French, German, Mandarin, Hindi, Japanese, and 150+ other languages — with AI voice cloning that preserves your speaking tone and style, and AI lip-sync that matches mouth movements to the new audio track. Tools like VideoDubber handle the entire dubbing pipeline — from transcription and translation through voice synthesis and lip-sync rendering — without any re-recording or studio costs.
The workflow integrates seamlessly with OBS exports:
This workflow is particularly powerful for companies recording customer support and product walkthrough videos with OBS. According to Gartner benchmarks, localizing support video content into the top 3–5 customer languages deflects 30–50% of support tickets from non-English-speaking markets, since self-service resolution costs roughly $1.84 per issue compared to $13.50 for agent-handled contacts. See the full methodology in our multilingual customer support video guide. For creators who want to expand to platforms like Bilibili (340 million Chinese users), OBS recordings dubbed into Mandarin using VideoDubber provide a complete production-plus-localization pipeline — for more on this strategy, see our Bilibili repurposing guide.
OBS Studio is completely free with no watermarks, no time limits, no subscription fees, and no paid tiers. It is an open-source project maintained by volunteer contributors and supported by community donations and platform sponsorships. Every feature — including multi-scene compositions, hardware encoding, audio filters, plugin support, and the Virtual Camera — is available to all users at no cost, making it one of the most feature-complete free tools in any software category.
MKV is the recommended recording format for active recording sessions because it is a more resilient container — if OBS crashes mid-recording, MKV files can be recovered without data loss, while MP4 files are often corrupted and unreadable. After recording, use OBS's built-in File > Remux Recordings tool to convert MKV to MP4 without any re-encoding or quality loss. For final delivery, editing, and platform upload, MP4 is universally compatible across all video editors and hosting platforms.
Use Window Capture instead of Display Capture. In the Sources panel, click "+", select "Window Capture", and choose the specific application window you want from the dropdown list. Window Capture records only that application's content — other windows, desktop notifications, and any sensitive information elsewhere on your screen remain private and are not included in the recording. This is the recommended approach for software tutorial recordings where you want to maintain focus and protect screen privacy.
For 1080p at 30fps, a bitrate of 10,000–15,000 Kbps produces high-quality recordings with manageable file sizes. For 1080p at 60fps, increase to 15,000–20,000 Kbps to maintain quality across fast motion. Using hardware encoding — NVIDIA NVENC, AMD HW H.264, or Apple VideoToolbox — allows these higher bitrates with significantly less CPU load compared to software encoding. Avoid dropping below 8,000 Kbps for 1080p content, as compression artifacts become clearly visible in text-heavy screen recordings and areas of fine detail.
Several optimizations reduce CPU load significantly: (1) Switch from software encoding (x264) to hardware encoding (NVENC, AMD HW, or Apple VT) in Settings > Output — this offloads the encoding workload entirely to the GPU. (2) Lower the output resolution or FPS if hardware encoding is unavailable or insufficient. (3) Reduce the number of active sources in your scenes, particularly Browser Sources, which are CPU-intensive. (4) Close bandwidth-heavy background applications — browsers with many open tabs, file sync services, and torrents — during recording sessions.
OBS can record Zoom or Teams meetings in two complementary ways. First, use Display Capture to record your entire screen during a call — straightforward but captures everything on screen. Second, use OBS's Virtual Camera (Tools > Start Virtual Camera) to broadcast your composed OBS scene into the call as your camera feed, then simultaneously record the OBS output locally. The second approach allows you to present a polished multi-source layout during the meeting while capturing a high-quality local recording with your audio filters and branding applied.
In the Sources panel, click "+", select "Video Capture Device", and choose your webcam from the device list. A live webcam feed will appear in the scene canvas. Resize and reposition it by clicking and dragging the corner handles — the most common placements are a corner overlay (Picture-in-Picture style at roughly 20–25% of frame width) or a split-screen composition with your screen capture on one half and webcam on the other. Hold Alt while dragging a handle to crop the webcam feed without scaling it.
At the recommended 20,000 Kbps bitrate for 1080p/60fps, OBS generates approximately 150 MB per minute, or around 9 GB per hour. At 12,000 Kbps for 1080p/30fps, expect roughly 90 MB per minute or about 5.4 GB per hour. Storage requirements scale directly with bitrate, so lower-motion content like slide presentations can use lower bitrates (8,000 Kbps) and will produce files closer to 60 MB per minute. Always verify available storage before starting a long recording session.
Download OBS Studio free → | Translate your recordings with VideoDubber →

With a background in AI and a passion for clear technical communication, I enjoy breaking down complex tools and processes. Exploring new software and sharing insights is a key focus.
How to stream on Twitch in 2026: step-by-step OBS setup, gear recommendations, internet requirements, audience growth strategies, and monetization explained.
How to start a YouTube channel in 2026: step-by-step setup, niche selection, SEO, algorithm mastery, Shorts strategy, and full monetization guide.
Is CapCut banned in 2026? Country-by-country status, €530M EU fine, June 2025 ToS IP risks, biometric data facts, and best privacy-safe alternatives.
Dive into my hands-on experience with the top 10 video translators of 2024. From speed and language options to usability, discover which tools truly deliver and why VideoDubber.ai stands out.
How to add subtitles to YouTube videos: step-by-step guide for YouTube Studio, SRT uploads, auto-captions, and third-party tools. Boost SEO and accessibility.