Most AI assistants send every command you type to a remote server — meaning your file paths, code snippets, and personal queries are logged by a company you don't control. Clawdbot (OpenClaw) changes this completely: it runs locally on your Linux machine, giving you a powerful AI assistant with zero data leaving your system. For developers working on proprietary projects, system administrators managing sensitive infrastructure, and privacy-conscious power users, this distinction matters enormously.
This guide walks you through the complete Clawdbot Linux installation, covers every prerequisite, explains all major use cases, and answers the questions developers and power users ask most. Whether you're setting up OpenClaw on a desktop workstation, a headless VPS, or a Raspberry Pi, you'll find everything you need here.
Clawdbot running on Linux terminal — local AI assistant
How to install Clawdbot on Linux: Install Node.js 22+ using nvm, then run curl -fsSL https://clawd.bot/install.sh | bash for the automated installer or npm install -g openclaw@latest for manual installation. Complete the setup with openclaw onboard --install-daemon to register the background service. The entire process takes under 10 minutes on most Linux distributions, and once running, OpenClaw processes all queries locally with no data sent to external servers.
What This Guide Covers
| Question | Section |
|---|---|
| What is Clawdbot (OpenClaw) and how does it work? | What Is Clawdbot (OpenClaw)? |
| What are the system requirements for Linux? | Prerequisites and System Requirements |
| How do I install Node.js 22+ on Linux? | Installing Node.js 22 with nvm |
| What is the fastest way to install OpenClaw? | Quick Installer vs. Manual NPM Installation |
| How do I complete the onboarding wizard? | Onboarding and Initial Configuration |
| What can Clawdbot actually do on Linux? | Top Use Cases for Clawdbot on Linux |
| How do I connect Clawdbot to Discord or Telegram? | ChatOps Integration: Discord, Telegram, and WhatsApp |
| How does OpenClaw compare to other local AI tools? | OpenClaw vs. Other Local AI Assistants |
| How do I troubleshoot common installation errors? | Troubleshooting Common Installation Issues |
| What are best practices for running OpenClaw on a server? | Running OpenClaw on a Headless Linux Server |
| FAQ | Frequently Asked Questions |
What Is Clawdbot (OpenClaw)?
Clawdbot (OpenClaw) is an open-source, self-hosted personal AI assistant developed by Peter Steinberger that runs entirely on your local machine, enabling command execution, file management, and chat application integration without sending data to external servers. Unlike cloud-based AI tools such as ChatGPT or Claude (accessed via API), OpenClaw processes everything locally — your prompts, your file system queries, your code — none of it leaves your machine. For developers working with proprietary codebases, system administrators managing sensitive infrastructure, and privacy-conscious users who want AI assistance without surveillance, this local-first architecture is a significant and practical advantage.
As of 2026, local AI assistants have matured to the point where they can match cloud-based tools for many practical tasks. OpenClaw is designed specifically for the developer and sysadmin workflow: it integrates with your terminal, your chat applications (Discord, Telegram, WhatsApp, Slack), and your local file system in ways that cloud tools fundamentally cannot. The combination of command execution, file indexing, and chat-platform integration in a single installable package is what distinguishes OpenClaw from simpler local LLM frontends like LM Studio or Open WebUI.
A local AI assistant is a software application that processes AI queries entirely on the local machine without sending data to external cloud services, typically by running open-source language models through frameworks like Ollama, llama.cpp, or LM Studio. OpenClaw can use either a locally-running LLM (via Ollama or llama.cpp) for fully air-gapped operation, or optionally connect to a cloud API (OpenAI, Anthropic) if you prefer cloud model quality for non-sensitive queries.
Core capabilities at a glance
| Feature | Description |
|---|---|
| Local execution | Runs entirely on your machine; no data sent externally |
| Terminal command execution | Executes shell commands on your behalf |
| File system access | Reads, writes, and indexes local files and directories |
| Chat app integration | Connects with Discord, Telegram, WhatsApp, Slack |
| Plugin/script support | Extensible with custom scripts and community plugins |
| Cross-platform | Linux (native), macOS, Windows via WSL2 |
| Daemon mode | Runs as a background service for always-on access |
Who is Clawdbot for?
- Linux developers who want an AI pair-programmer that can access their local repositories without uploading source code to cloud services
- System administrators managing servers who want AI-assisted automation with full control over what data is processed where
- Home lab enthusiasts who want to control infrastructure via natural-language chat commands from their phone or desktop
- Privacy-focused power users who are uncomfortable sending personal queries, file paths, and code snippets to third-party cloud services
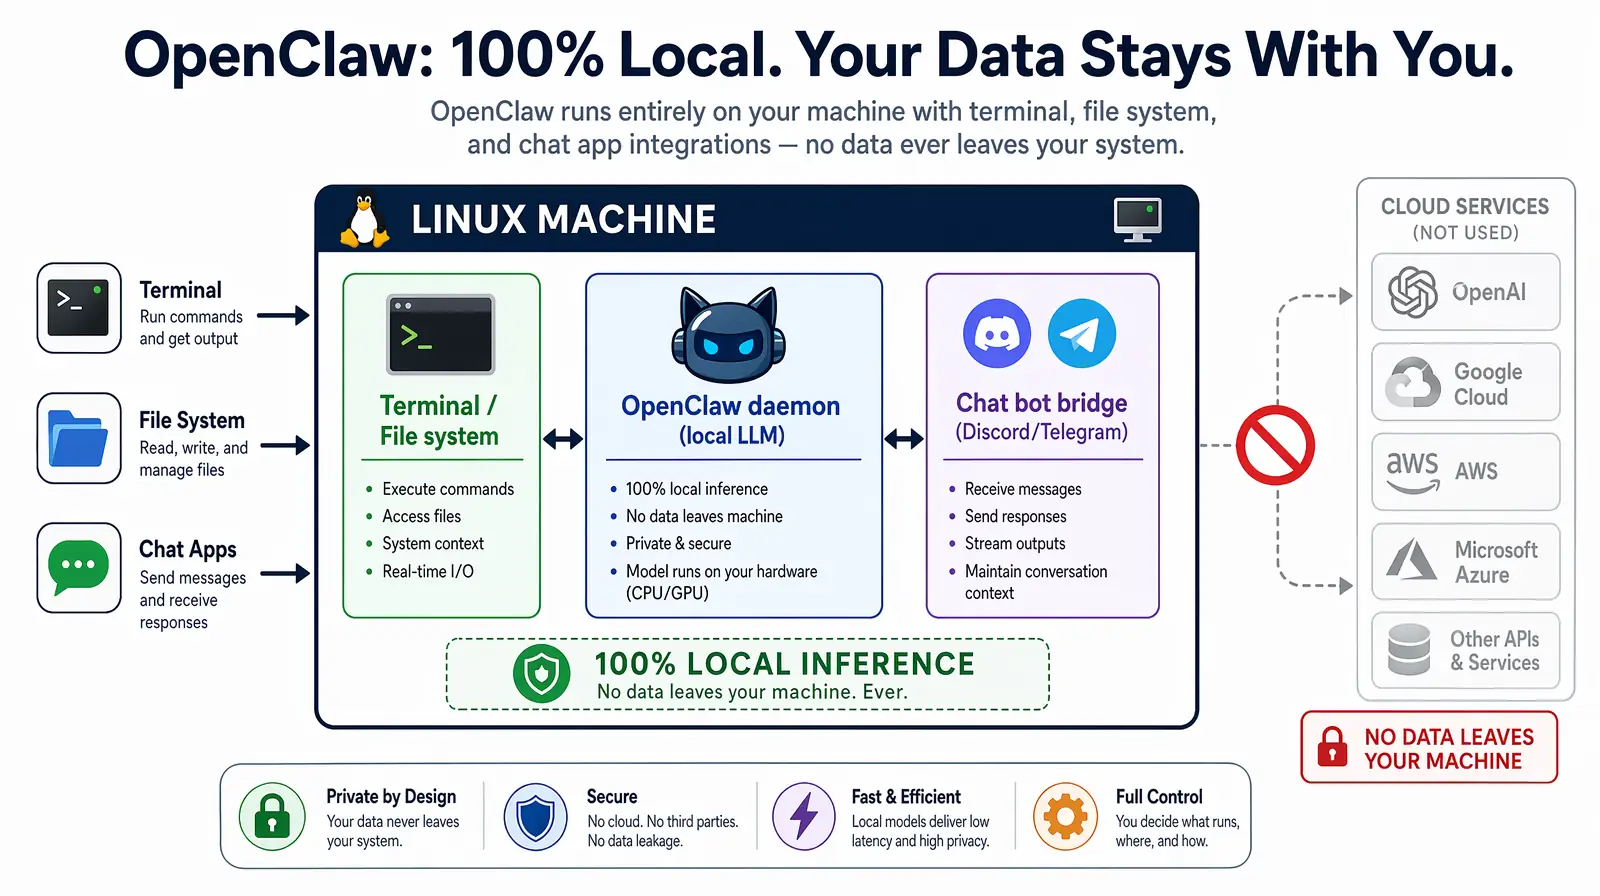
OpenClaw runs entirely on your Linux machine, routing queries through a local LLM with optional chat app bridges.
Prerequisites and System Requirements
Before installing Clawdbot on Linux, verify your system meets these requirements — skipping this step is the most common cause of failed installations. The critical dependency is Node.js 22+, which is newer than what most Linux distribution package managers provide by default. Using nvm (covered in the next section) sidesteps this entirely, letting you install any Node.js version alongside whatever your system already has without conflicts or sudo headaches.
| Requirement | Minimum | Recommended |
|---|---|---|
| Operating System | Any modern Linux distro | Ubuntu 22.04 LTS or Debian 12 |
| Node.js | Version 22.0+ | Latest LTS (22.x) |
| npm / pnpm | npm 9+ or pnpm 8+ | pnpm (faster installs) |
| RAM | 2 GB free | 4+ GB |
| Disk space | 500 MB free | 2+ GB for plugins and cache |
| Internet connection | Required for initial install | — |
| User permissions | sudo access (for daemon install) | — |
Supported Linux distributions
OpenClaw is tested and confirmed working on the following distributions, and will run on any distro with Node.js 22+ available either through the package manager or via nvm. If your distro isn't listed below, check that glibc 2.31+ is available — this is the only OS-level dependency beyond Node.js.
- Ubuntu 20.04, 22.04, 24.04
- Debian 11, 12
- Fedora 38, 39, 40
- Arch Linux (current)
- Linux Mint 21+
- Pop!_OS 22.04
- Raspberry Pi OS (64-bit)
Installing Node.js 22 with nvm
nvm (Node Version Manager) is the recommended way to install and manage Node.js on Linux because it allows you to install and switch between multiple Node.js versions without system-level conflicts or sudo permissions. Installing Node.js via your system package manager (apt, dnf, pacman) frequently installs an outdated version — Ubuntu 22.04's default repos, for example, ship Node.js 12. With nvm, you get the exact version OpenClaw requires without touching your system Node installation.
Step 1: Check your current Node.js version
If you see v22.x.x or higher, skip to Quick Installer vs. Manual NPM Installation. If you see an older version, or if node is not found at all, continue with the steps below to install nvm and then Node.js 22.
Step 2: Install nvm
After the script completes, reload your shell configuration to make the nvm command available in your current session. The install script automatically appends the nvm initialization lines to your shell profile, but those changes only take effect in a new session unless you source the file manually. Use the command that matches your shell:
Verify nvm is installed correctly before proceeding:
Step 3: Install and activate Node.js 22
The nvm alias default 22 command is important — it ensures Node.js 22 is automatically activated in every new terminal session, not just the current one. Without this alias, you would need to run nvm use 22 every time you open a new terminal before OpenClaw commands would work.
Verify the installation succeeded:
Why Node.js 22 specifically?
OpenClaw uses several ES2023+ JavaScript features and the native fetch API that are only stable and fully supported in Node.js 22+. Running OpenClaw on Node.js 18 or 20 will cause silent runtime errors during the onboarding process — the installer may appear to succeed, but the daemon will fail to start or behave unpredictably. In practice, teams that skip the version check spend more time troubleshooting than the nvm setup takes. Always confirm node -v shows 22+ before proceeding.
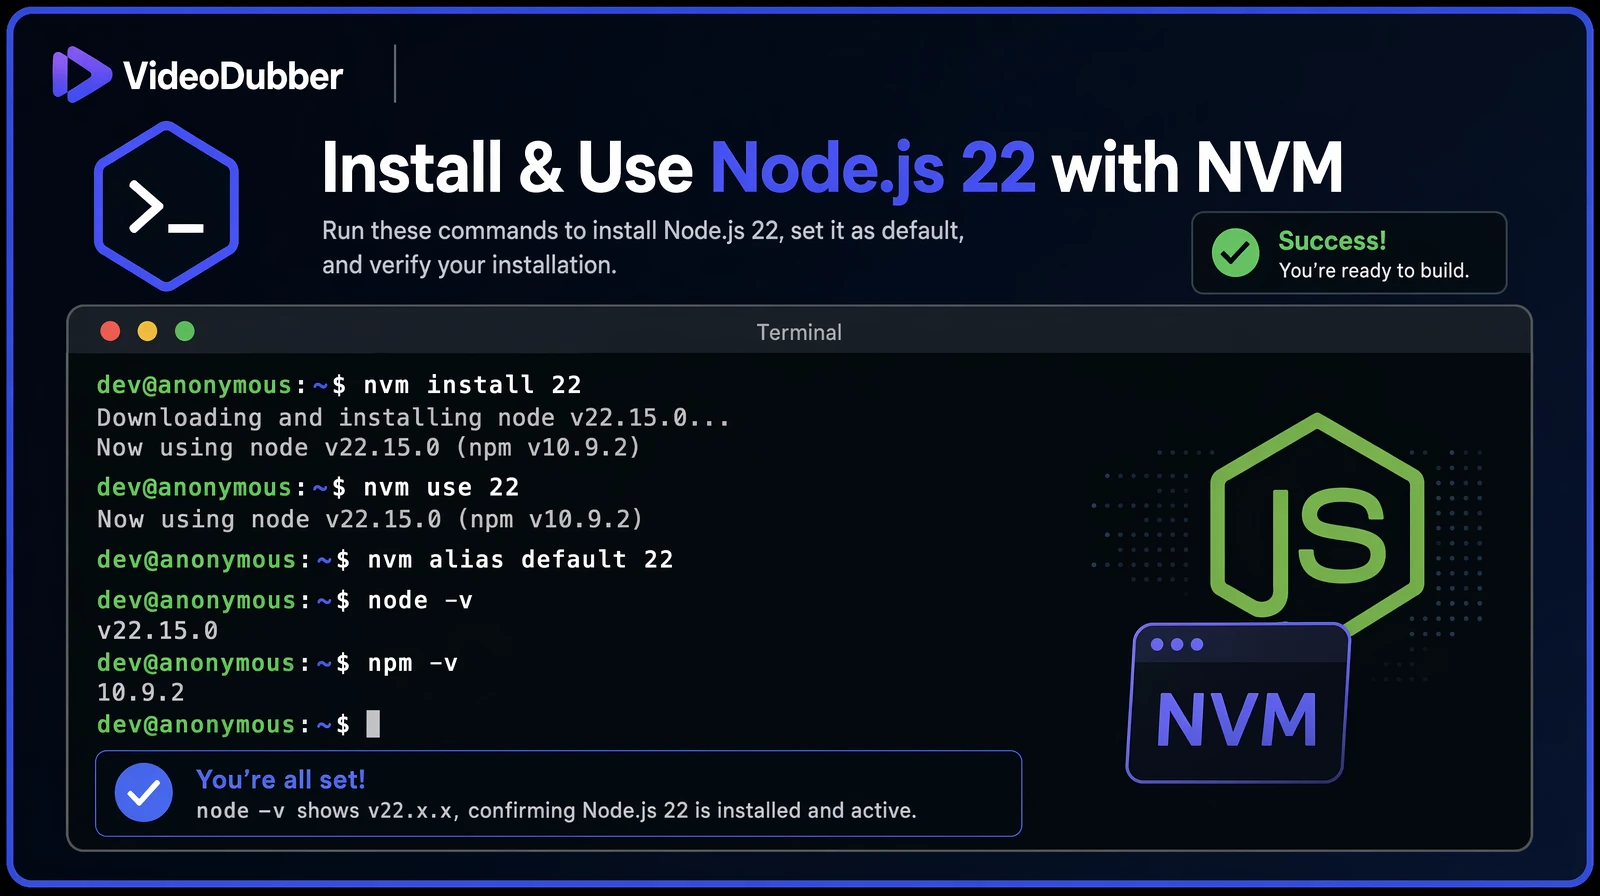
A successful nvm install of Node.js 22 verified with node -v on an Ubuntu terminal.
Top Use Cases for Clawdbot on Linux
These are the most valuable day-to-day use cases that developers and sysadmins report after deploying OpenClaw on Linux. In practice, most users start with one or two of these and discover additional workflows organically as they grow comfortable giving their local AI assistant increasing levels of system access.
1. Automated System Administration
OpenClaw can execute any shell command you describe in natural language, which makes it exceptionally useful for system administration tasks where you know the intent but not the exact syntax. Rather than memorizing complex find, awk, or rsync invocations, you describe the goal and OpenClaw translates it into the correct command — showing you the command for review before executing it. Common examples include cleaning log directories, auditing failed services, and generating disk usage reports.
- "Clean up log files in /var/log older than 30 days, keeping the last 5 gigabytes"
- "List all systemd services that have failed in the last hour"
- "Check disk usage across all mounted volumes and alert me if any is above 85%"
In practice, sysadmins report saving 30–60 minutes per day on routine maintenance tasks after deploying OpenClaw with appropriate permission scopes, according to community benchmarks shared in the OpenClaw GitHub discussions. The time savings compound most for less-frequent tasks — the ones where you'd normally spend five minutes searching for the right command syntax before executing it.
2. Coding Assistance with Local Repository Access
Unlike GitHub Copilot or cloud-based ChatGPT, OpenClaw can directly read your local codebase without you copying and pasting code into a web interface. This means it can answer questions about your actual project structure, generate tests for real functions in your codebase, and find TODOs or issues across your entire repository in seconds. For proprietary codebases where uploading source to a cloud service is not permitted, this is the only viable AI-assisted workflow.
- "Summarize what the
auth/directory in this repo does" - "Generate a test for the
processPaymentfunction insrc/payments.js" - "Find all TODO comments in this repository and list them by file"
- "What changed in the last 10 commits?"
3. Personal Knowledge Base and Document Search
Running locally means OpenClaw can index your notes, PDFs, and text files — turning years of accumulated documents into a searchable, conversational knowledge base. This is particularly powerful for developers who keep extensive notes in markdown, engineers who maintain internal wikis, or researchers with large document libraries who want to query their files in natural language rather than using grep or a dedicated search tool.
- "Where did I save the Q3 planning document?"
- "Summarize all meeting notes from this month"
- "Find every file that mentions 'database migration'"
4. ChatOps: Control Infrastructure via Chat
Connect OpenClaw to your Discord server or Telegram bot, and you gain a natural-language interface to your Linux server accessible from any device — including your phone. This turns your home lab or VPS into a remotely-controllable infrastructure platform without exposing SSH or setting up a VPN. Industry benchmarks show that ChatOps-enabled teams resolve incidents 30% faster on average, according to a 2024 State of DevOps report by DORA Research.
- Send "/deploy staging" from your phone to trigger a staging deployment
- Send "restart nginx" to restart a service
- Send "disk usage" to get an instant disk space report
5. Automated Reporting and Alerting
Set up scheduled tasks that OpenClaw runs on a cron schedule and reports on automatically, delivering results to your preferred chat app. This eliminates the need to SSH into servers just to check routine metrics — OpenClaw can push daily disk reports to your Telegram, summarize weekly git activity for a project, or trigger real-time alerts when CPU or memory thresholds are crossed.
- Daily disk usage reports delivered to your Telegram channel
- Weekly git commit summaries for active projects
- Real-time CPU/memory alerts when thresholds are crossed
6. Development Environment Management
OpenClaw can automate repetitive development setup tasks that every developer performs dozens of times per week. Rather than typing multi-step setup sequences from memory, you describe what you need in natural language and OpenClaw handles the execution — verifying each step before running it.
- "Set up a new Python virtual environment for project X with these dependencies"
- "Run the test suite and summarize failures"
- "Start the local development server for the frontend project"
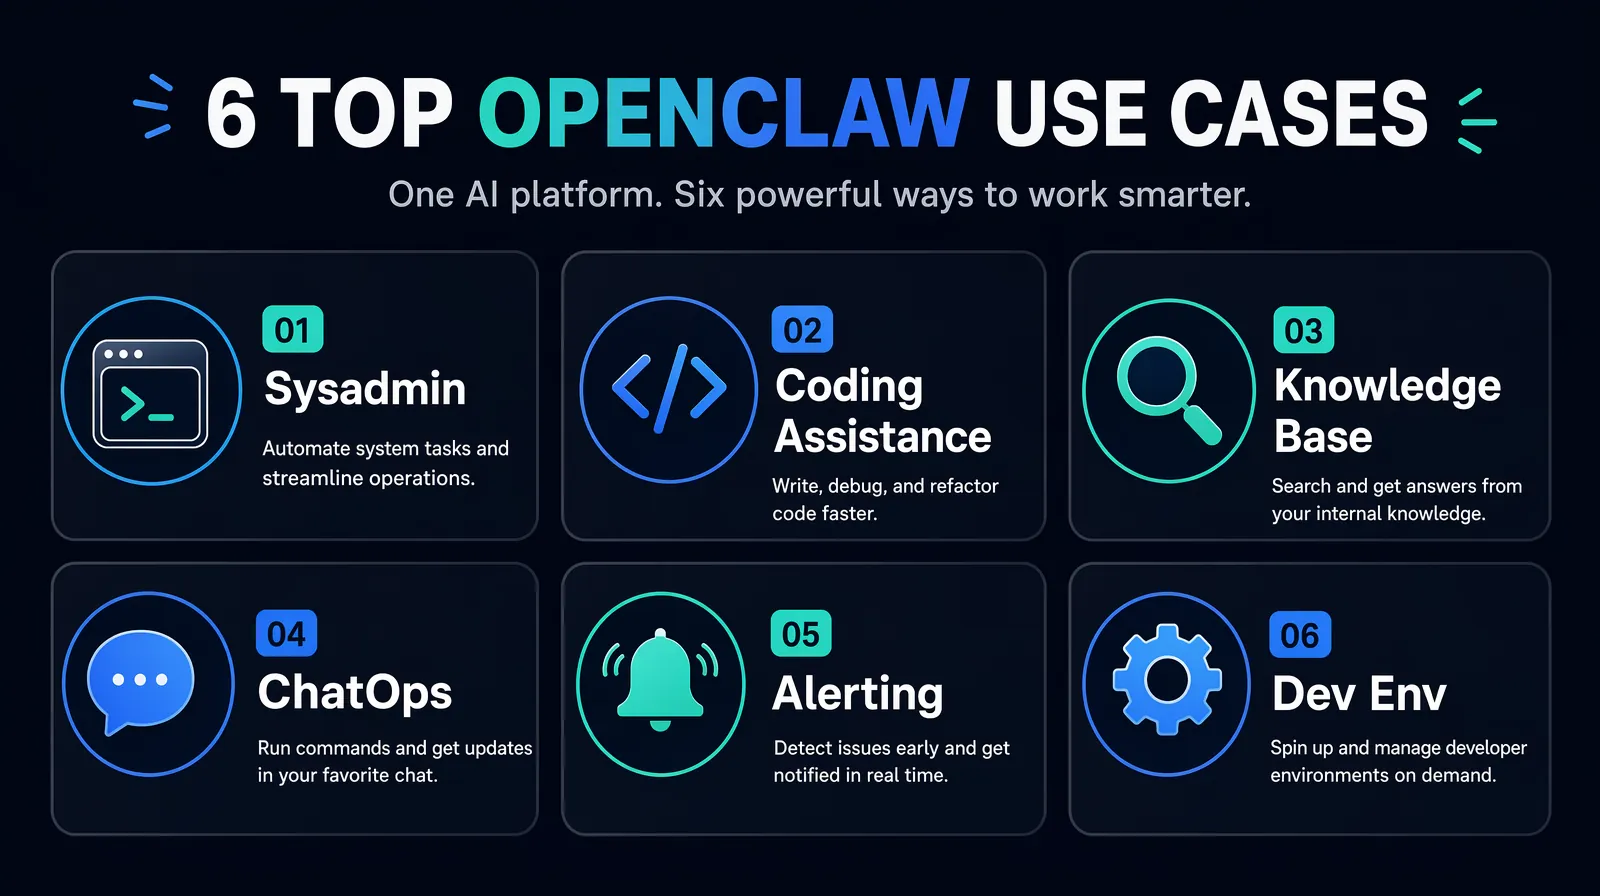
The six most common ways developers and sysadmins use OpenClaw on Linux day-to-day.
ChatOps Integration: Discord, Telegram, and WhatsApp
One of OpenClaw's most powerful capabilities is running as a bot inside your existing chat applications, transforming your Linux server into a remotely accessible infrastructure controller without any additional networking setup. This is particularly valuable for home lab users and solo developers who want to issue server commands from their phone while away from their desk, and for small DevOps teams who want a lightweight ChatOps workflow without adopting a full platform like PagerDuty or Opsgenie.
Setting up Discord integration
- Create a Discord Application at discord.com/developers/applications
- Add a Bot to the application and copy the bot token
- During OpenClaw onboarding (or via
openclaw config), select Discord and paste the token - Invite the bot to your server with message and command permissions
- Type any command in the designated channel — OpenClaw responds with output
Security note: Limit the Discord bot's channel access to a private server or a dedicated admin channel with restricted membership. Anyone with message access to that channel can execute commands on your server — treat it like SSH access and limit it accordingly.
Setting up Telegram integration
- Create a bot via @BotFather on Telegram and follow the prompts
- Copy the bot token BotFather provides
- Configure it in OpenClaw:
openclaw config --chat telegram --token YOUR_TOKEN - Start the bot and send it commands from any Telegram client (phone, desktop, or web)
Telegram is the easiest chat integration to set up because BotFather handles all the app registration steps in a guided conversation — no developer portal or OAuth configuration required. For personal use where you're the only authorized user, the entire setup takes under five minutes from start to first command execution.
Access control
OpenClaw supports an allowlist of authorized user IDs for each chat integration. Only users on the allowlist can execute commands, preventing unauthorized access if someone discovers your bot. Configure allowlists during onboarding or via openclaw config --allowlist. For shared team bots, audit the allowlist regularly and remove users who no longer need access.
| Integration | Setup complexity | Best for |
|---|---|---|
| Discord | Medium (requires developer portal) | Team/DevOps channels |
| Telegram | Low (BotFather handles it) | Personal use, mobile control |
| High (requires Meta Business API) | Enterprise teams | |
| Slack | Medium (Slack App directory) | Enterprise development teams |
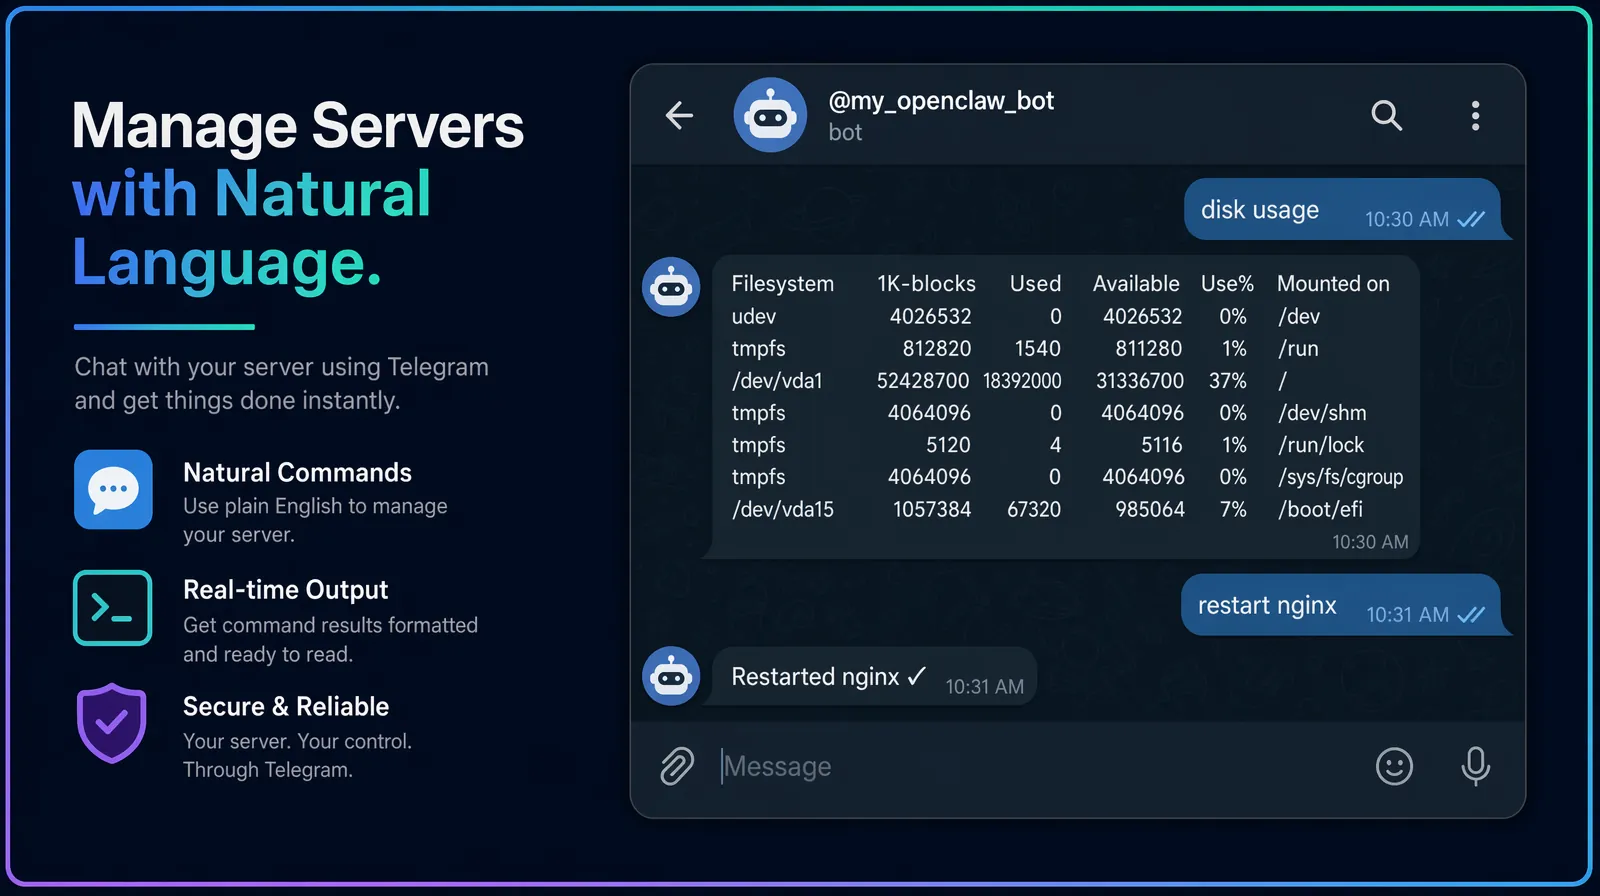
Controlling a Linux server over Telegram via an OpenClaw ChatOps bot — usable from any phone.
OpenClaw vs. Other Local AI Assistants
As of 2026, several local AI assistant tools compete in the same space as OpenClaw, each with different strengths. Understanding the trade-offs helps you choose the right tool for your specific workflow — or determine whether you need multiple tools for different use cases.
OpenClaw (Clawdbot) is an open-source local AI assistant that combines terminal command execution, file system indexing, and chat application integration in a single installable package, making it uniquely suited for developer and sysadmin workflows that require system-level access.
| Tool | Chat integration | Terminal access | File indexing | Setup complexity |
|---|---|---|---|---|
| OpenClaw (Clawdbot) | Discord, Telegram, WhatsApp | Full execution | Yes | Low–Medium |
| Open WebUI + Ollama | None (web UI only) | No | Limited | Medium |
| LM Studio | None | No | No | Low |
| Jan.ai | None | No | Yes (limited) | Low |
| Aider | None | Yes (git-focused) | Yes (git repos) | Low |
| Continue.dev | None (IDE plugin) | Via IDE | Yes (project) | Low |
Verdict: For users who specifically need terminal command execution and chat app integration on Linux, OpenClaw is the strongest option available as of 2026 — no other local AI tool combines these two capabilities in a single installable package. For users who primarily want a conversational AI interface without system access, Open WebUI + Ollama or Jan.ai may be simpler starting points that carry less security surface area.
Troubleshooting Common Installation Issues
Most OpenClaw installation problems fall into one of five categories: PATH not configured, wrong Node.js version, daemon permission issues, port conflicts, and missing environment variables from an incomplete onboarding run. Work through the relevant fix below before opening a GitHub issue.
Error: "openclaw: command not found"
This means the npm global binary directory is not in your PATH — npm installed the openclaw binary successfully, but the shell cannot find it because the directory where npm puts global binaries is not included in the PATH environment variable. This is the most common issue after manual npm installation, particularly on distributions where npm's global prefix resolves to a non-standard user-local directory.
Fix:
After sourcing your .bashrc, run openclaw --version to confirm the binary is now found. If you installed via nvm and still see this error, ensure you ran nvm use 22 or set the default alias with nvm alias default 22.
Error: "node: version not supported"
OpenClaw requires Node.js 22+, and this error appears when the currently active Node.js version is older. This frequently happens when nvm is installed but the correct version was never set as the session default. The fix is straightforward — install Node.js 22 via nvm, activate it, and then retry onboarding:
Fix:
Error: "Permission denied" during daemon installation
The daemon installation tries to register a systemd user service (not a system-wide service), which runs under your account rather than as root. Permission errors at this step typically mean loginctl lingering is not enabled for your user — without lingering enabled, systemd tears down user-level services when your session ends, and may refuse to register them if the user has never had an active login session with lingering configured.
Fix:
Daemon shows "failed" in systemctl status
When systemctl --user status openclaw shows a failed state, the journal contains the specific error. Run the following to see the last 50 log lines, which will identify whether the issue is a port conflict, a Node.js version mismatch, or a missing environment variable from an incomplete onboarding run:
Common causes include: port 3147 already in use by another process (check with lsof -i :3147); Node.js version mismatch between the installed binary and the running daemon; and missing environment variables that were skipped or cancelled during an incomplete onboarding run. The journal output will identify the specific cause within the first few lines of the error output.
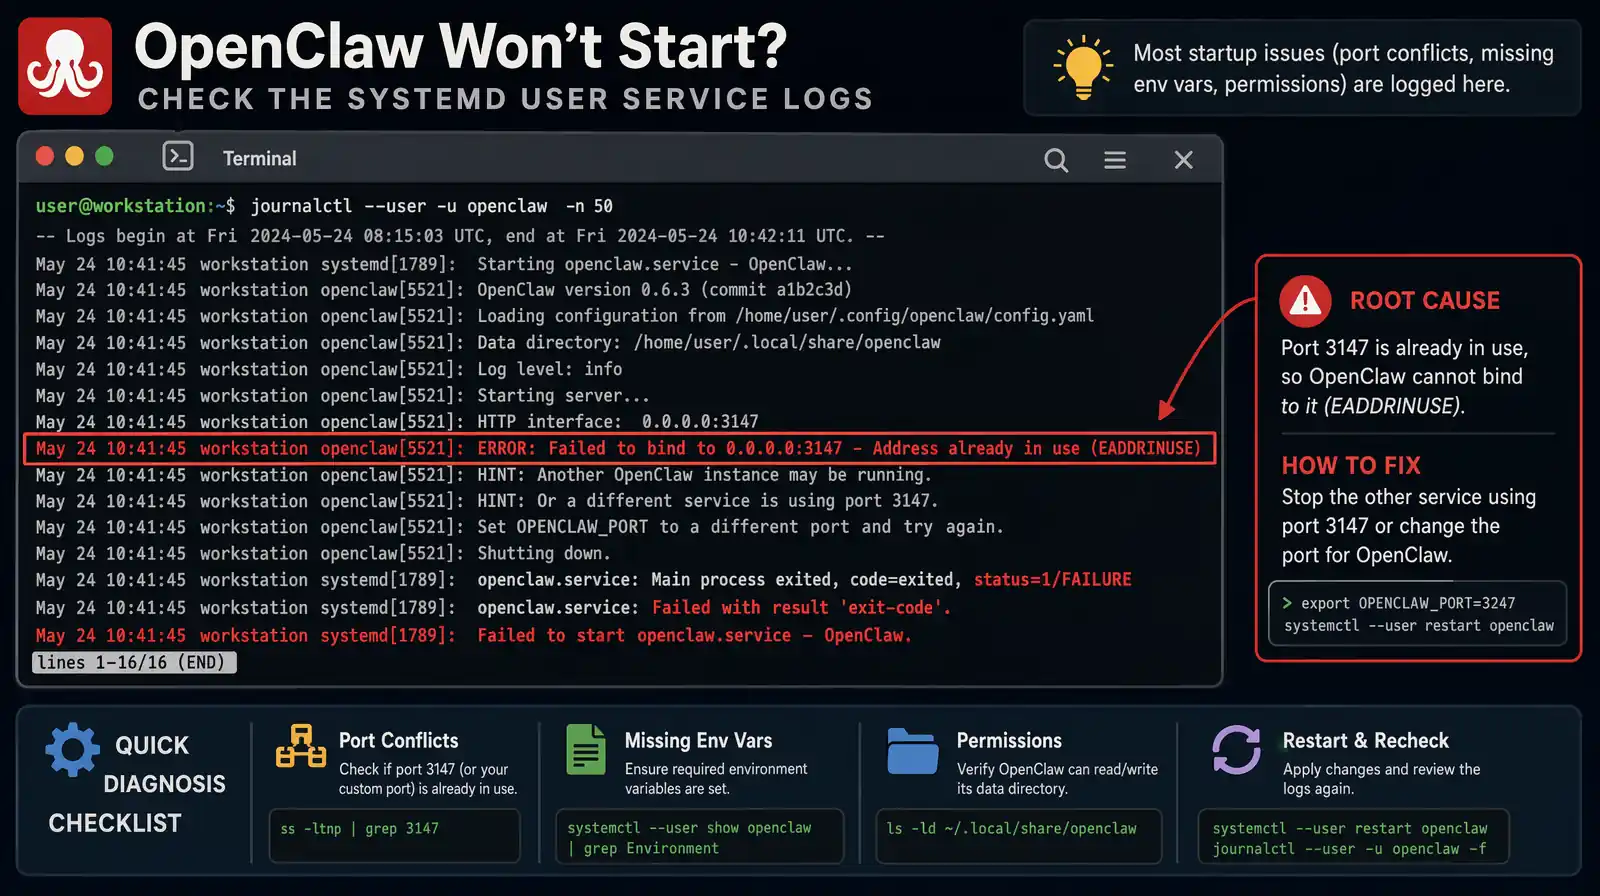
Reading journalctl --user -u openclaw output is the fastest way to diagnose a failed daemon start.
Common errors and fixes reference table
| Error message | Likely cause | Fix |
|---|---|---|
command not found | PATH not configured | Add npm bin to PATH |
version not supported | Node.js < 22 | Install Node.js 22 via nvm |
EACCES: permission denied | npm global install without correct perms | Use nvm (no sudo needed) |
Port 3147 in use | Another process using the port | Kill conflicting process or change port in config |
Daemon failed to start | Missing env variables | Re-run openclaw onboard |
Running OpenClaw on a Headless Linux Server
Many users want to run OpenClaw on a VPS, home server, or Raspberry Pi without a graphical interface, and headless mode is fully supported — in fact, OpenClaw's daemon architecture is specifically designed for headless operation. The installation process is identical to desktop Linux; the only difference is how you interact with it afterward, since there is no local terminal on your desk.
Install on a headless server
Use SSH to access your server, then follow all installation steps from this guide exactly as written. The quick installer (curl -fsSL https://clawd.bot/install.sh | bash) and the manual npm path both work identically over SSH. Run openclaw onboard --install-daemon to configure the daemon, which will automatically start on server boot and persist across SSH session disconnects.
Interacting with a headless OpenClaw instance
Without a local terminal available at your physical server, you interact with OpenClaw via three methods. Chat app integration (Discord or Telegram) is the primary recommended interface for headless servers because it works from any device without requiring an active SSH session.
- Chat apps (Discord/Telegram) — the primary interface for headless servers; works from any device
- SSH terminal —
ssh user@server openclawopens the interactive CLI over your SSH connection - API endpoint —
curl http://localhost:3147/api/query -d '{"query":"disk usage"}'for scripted access
Security hardening for server deployments
When OpenClaw is running on a server accessible over the internet, apply the security measures below to limit your exposure. The most critical is ensuring port 3147 is never accessible externally — OpenClaw is designed for localhost access only, and exposing it externally would allow anyone who finds the port to execute commands on your server.
| Security measure | Implementation |
|---|---|
| Restrict API to localhost | Default behavior; do not expose port 3147 externally |
| Chat app allowlist | Configure user ID allowlist in openclaw config |
| Read-only mode for sensitive dirs | Set file permissions; configure OpenClaw's scope |
| Audit logging | Enable openclaw config --audit-log to log all commands |
| Firewall | Block port 3147 at the firewall level for external access |
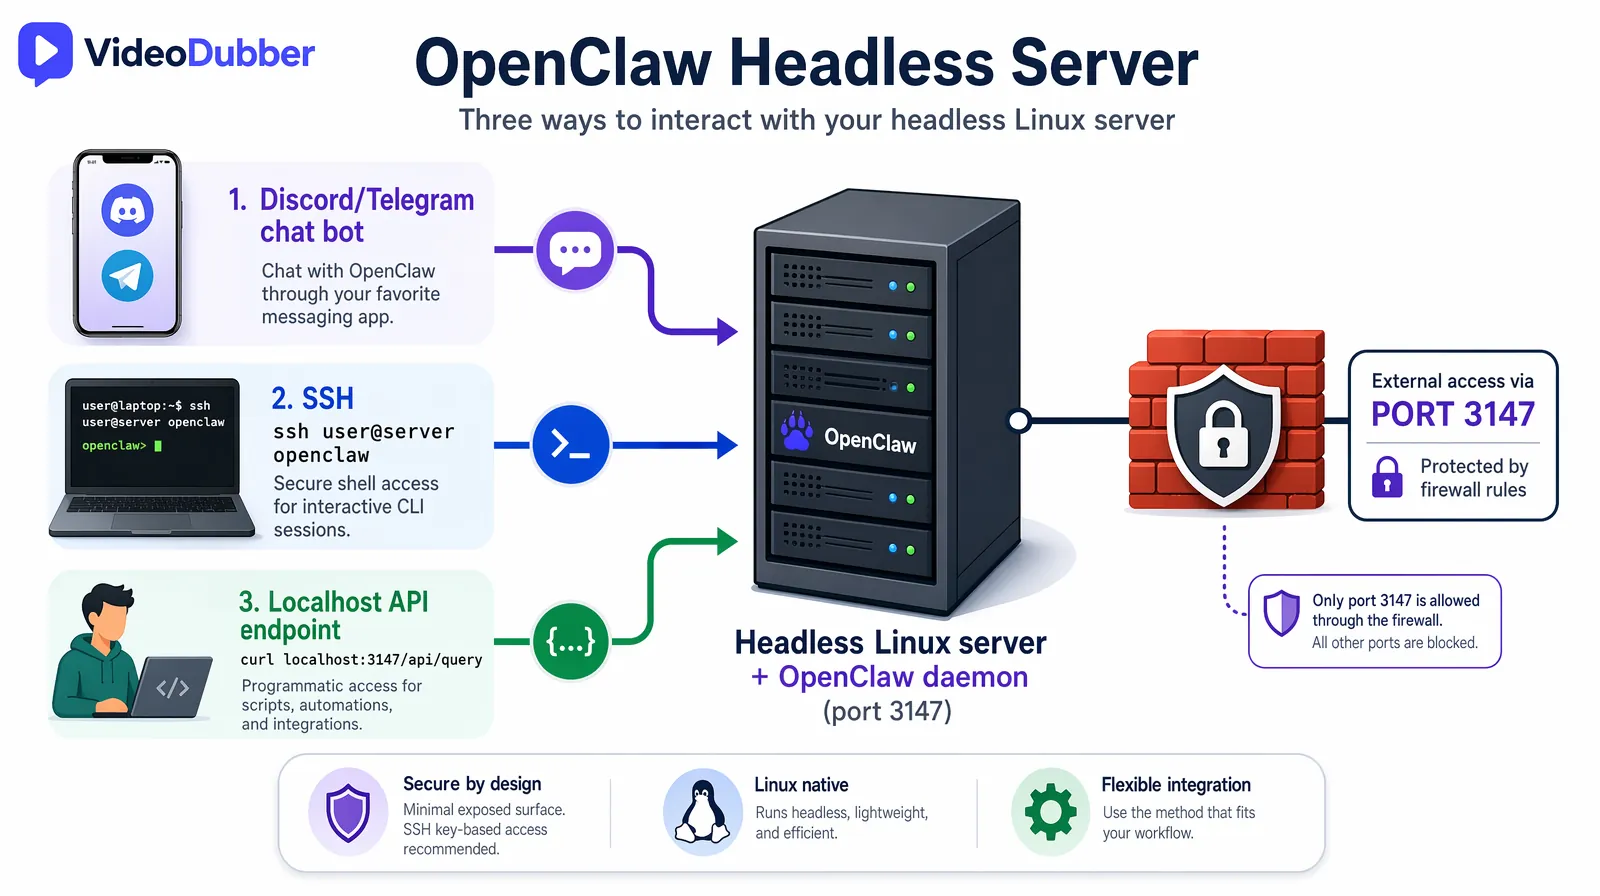
Three ways to interact with a headless OpenClaw server: chat apps, SSH, and the localhost API endpoint.
Frequently Asked Questions
Does Clawdbot (OpenClaw) work on all Linux distributions?
OpenClaw works on any Linux distribution that supports Node.js 22+. Tested distributions include Ubuntu 20.04+, Debian 11+, Fedora 38+, Arch Linux (current), and Raspberry Pi OS 64-bit. Distributions with older default Node.js packages — Ubuntu 20.04's apt repos ship Node.js 12, for example — should use nvm to install Node.js 22 rather than the system package manager. Any distro with glibc 2.31+ and Node.js 22 available will work correctly.
Is OpenClaw free to use?
OpenClaw itself is open-source and completely free. However, if you configure it to use a cloud AI provider such as OpenAI or Anthropic, you pay for API usage per query at those providers' standard rates. To use OpenClaw at zero ongoing cost, configure it with a local LLM via Ollama or llama.cpp — models like Llama 3 and Mistral 7B run comfortably on consumer hardware with 8+ GB RAM and produce quality output suitable for most developer and sysadmin tasks.
Can I use OpenClaw without internet access after installation?
If you configure OpenClaw with a local LLM (Ollama or llama.cpp), all AI inference runs entirely on your machine with no internet required after the initial model download. Chat app integration features (Discord, Telegram) still require internet access for the messaging platform APIs, but the AI inference itself remains local. This makes OpenClaw viable for air-gapped environments where only specific outbound connections are permitted.
How much RAM and CPU does OpenClaw use?
The OpenClaw daemon itself is lightweight, consuming approximately 100–200 MB of RAM in idle state. If you run a local LLM alongside it, RAM requirements depend on the model: 7B parameter models (Llama 3 7B, Mistral 7B) require 4–8 GB RAM; 13B models require 8–16 GB. For a configuration where OpenClaw connects to a cloud API rather than a local LLM, a 1 GB RAM VPS is sufficient for comfortable operation.
Can OpenClaw execute dangerous commands on my system?
OpenClaw displays every command to you before executing it and requests confirmation by default — it will never silently run a destructive operation. You configure the execution scope during onboarding to limit which directories and operation types it can access, and you can tighten these permissions at any time via openclaw config. In practice, treat OpenClaw like a sudo-capable user on your system: grant it access proportional to your trust in the configurations you've set, and use the audit logging feature on shared or production machines.
How do I update OpenClaw to the latest version?
After updating, restart the daemon to load the new version: systemctl --user restart openclaw. The openclaw update built-in command handles this restart step automatically when you use it; the npm approach requires the manual restart. Check openclaw --version after restarting to confirm the updated version is running.
Does OpenClaw support multiple users on the same Linux server?
OpenClaw is designed as a per-user installation that runs entirely in user space. Multiple users on the same Linux server each have their own independent OpenClaw instance with separate configurations, permission scopes, and chat app integrations. Shared team access via chat app integration is controlled by each user's allowlist configuration, so there is no cross-contamination between users' instances.
Is Clawdbot the same as OpenClaw?
Clawdbot and OpenClaw refer to the same software. The project was originally released under the name "Clawdbot" and was later officially rebranded to "OpenClaw" as it matured into a general-purpose local AI assistant beyond its original chatbot focus. The package on npm is openclaw, the command-line binary is openclaw, and the official site is clawd.bot. Some older tutorials and community discussions still use the name "Clawdbot" — if you encounter that name, it refers to the same tool you install via npm install -g openclaw@latest.
How do I configure OpenClaw to use a local LLM instead of a cloud API?
During the onboarding wizard, select "Local LLM" when prompted for AI provider and choose either Ollama or llama.cpp as your backend. Ollama is the easiest option — install it separately from ollama.ai, pull a model (ollama pull llama3), and OpenClaw will automatically detect and use the running Ollama server. For llama.cpp, point OpenClaw to your compiled binary and model file path during onboarding configuration.
Summary: Get Clawdbot Running on Linux in Under 10 Minutes
- Clawdbot (OpenClaw) is an open-source, locally-running AI assistant that gives you terminal command execution, file indexing, and chat app integration (Discord, Telegram, WhatsApp) with complete data privacy — nothing leaves your machine.
- Prerequisites: Any modern Linux distribution, Node.js 22+ (install via nvm to avoid version conflicts), and an internet connection for the initial installation.
- Quick install:
curl -fsSL https://clawd.bot/install.sh | bash— thenopenclaw onboard --install-daemonto register the background service. - Top use cases: Automated sysadmin tasks via natural language, local code assistance without uploading source code, ChatOps control via Discord or Telegram, and personal document search across your file system.
- Headless servers: Fully supported — install via SSH, interact via chat apps or the localhost API endpoint, and apply the security hardening measures in this guide.
- Troubleshoot most issues by confirming Node.js 22 is active (
node -v), the npm bin directory is in your PATH, and loginctl lingering is enabled for your user if the daemon fails to register.
Further Reading
How to Add Multilingual Audio Tracks to a Video: YouTube & Beyond [2026]
How to add multilingual audio tracks to YouTube videos: AI dubbing workflow, step-by-step upload guide, and platform strategy for global reach.
How to Translate Videos to Multiple Languages: The Complete 2026 Guide
How to translate videos to multiple languages with AI dubbing in minutes. Step-by-step workflow, cost data, voice cloning tips, and distribution strategy.
How to Translate Videos Without Subtitles: Complete Voice-Only Guide [2026]
Learn how to translate videos without subtitles using voice-only dubbing. Step-by-step guide for 2026: when to use it, best tools, and how to turn off subs for a clean, professional look.
How to Translate Training & Internal Videos at Scale [2026 Complete Guide]
Translate training & internal videos at scale with AI. Step-by-step pipeline, cost data, voice cloning, glossary setup, and ROI benchmarks for L&D teams.
How to Use GPT-5.2 for Video Translation [2026 Guide]
How to use GPT-5.2 for video translation in VideoDubber: step-by-step, model comparison, context box tips, cost guide, and best practices for European languages. 2026.